User/Role Management
The User and Role Management section in Arvist allows administrators to create and manage user accounts, assign roles, and define access permissions across the platform. Arvist provides a robust Role-Based Access Control (RBAC) system with granular customization options, giving organizations precise control over who can view or modify specific resources. This ensures secure, organized, and efficient management of user access throughout the application.
After clicking on User Management in the sidebar, the users page is presented with selectable tabs on top: Users and Roles.
Users Page
The user page lists all users and their respective statuses, roles, and contact information. From here, permitted users may view, edit, or delete existing users, as well as re-invite users who have not activated their accounts yet. In order to allow access to the platform (and receive notifications), a user must be invited to create and activate their account.
Inviting a New User
Users with user management permissions will be allowed to invite new users to the platform.
- Navigate to User Management on the left-hand menu.
- Click on + Add new users to add a new user to invite.
In the Add new user form:
- First name: Enter the user's first name.
- Last name: Enter the user's last name.
- Email address: Enter the user's company email address.
- Mobile Number: (Optional) Select the user's country code and enter the user's phone number.
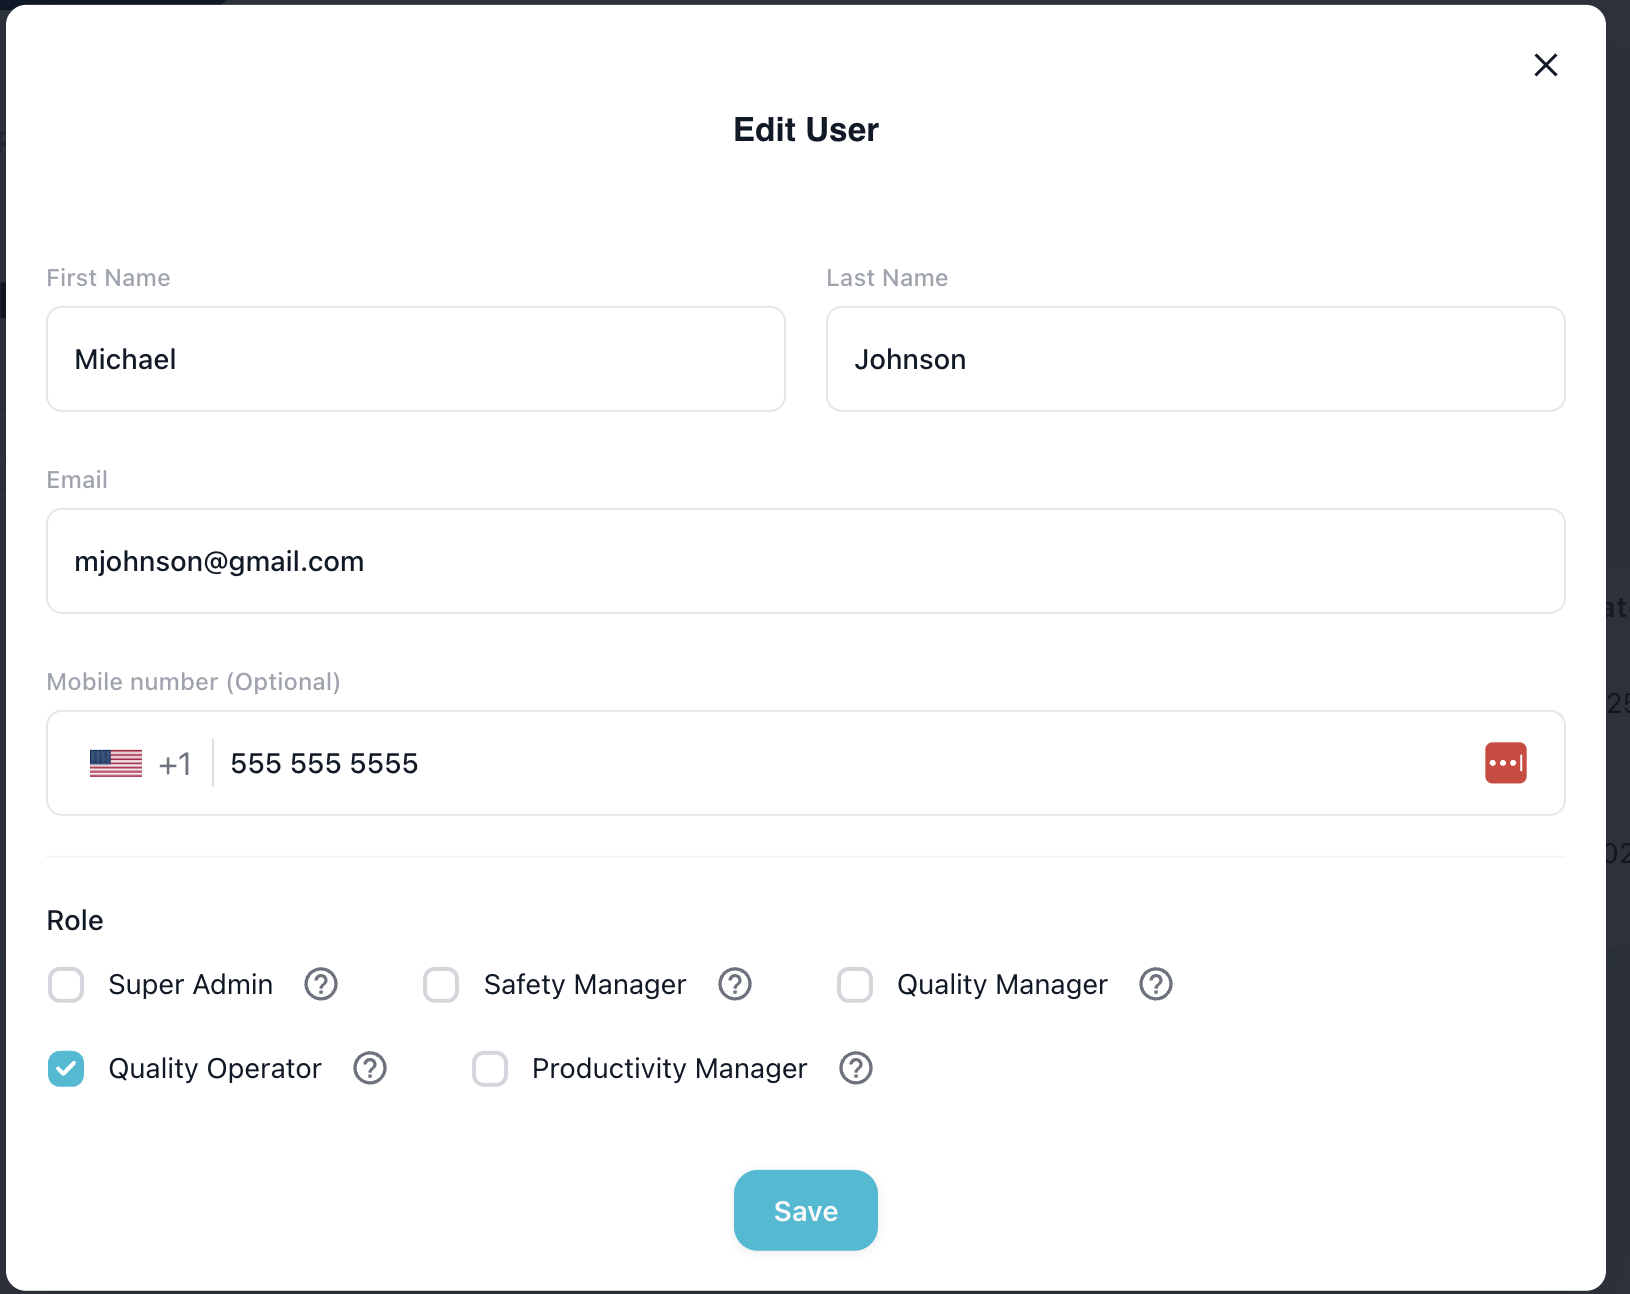
- Role: Select the user's roles. Multiple roles may be selected to provide any required permission overlaps.
After filling in the details, click Invite user to invite the user via the provided email.
Managing Users
Once users are added, they will appear in the user list under User Management, with an invited status and a timestamp for when the account was created. After successful activation, their status will be changed to active.
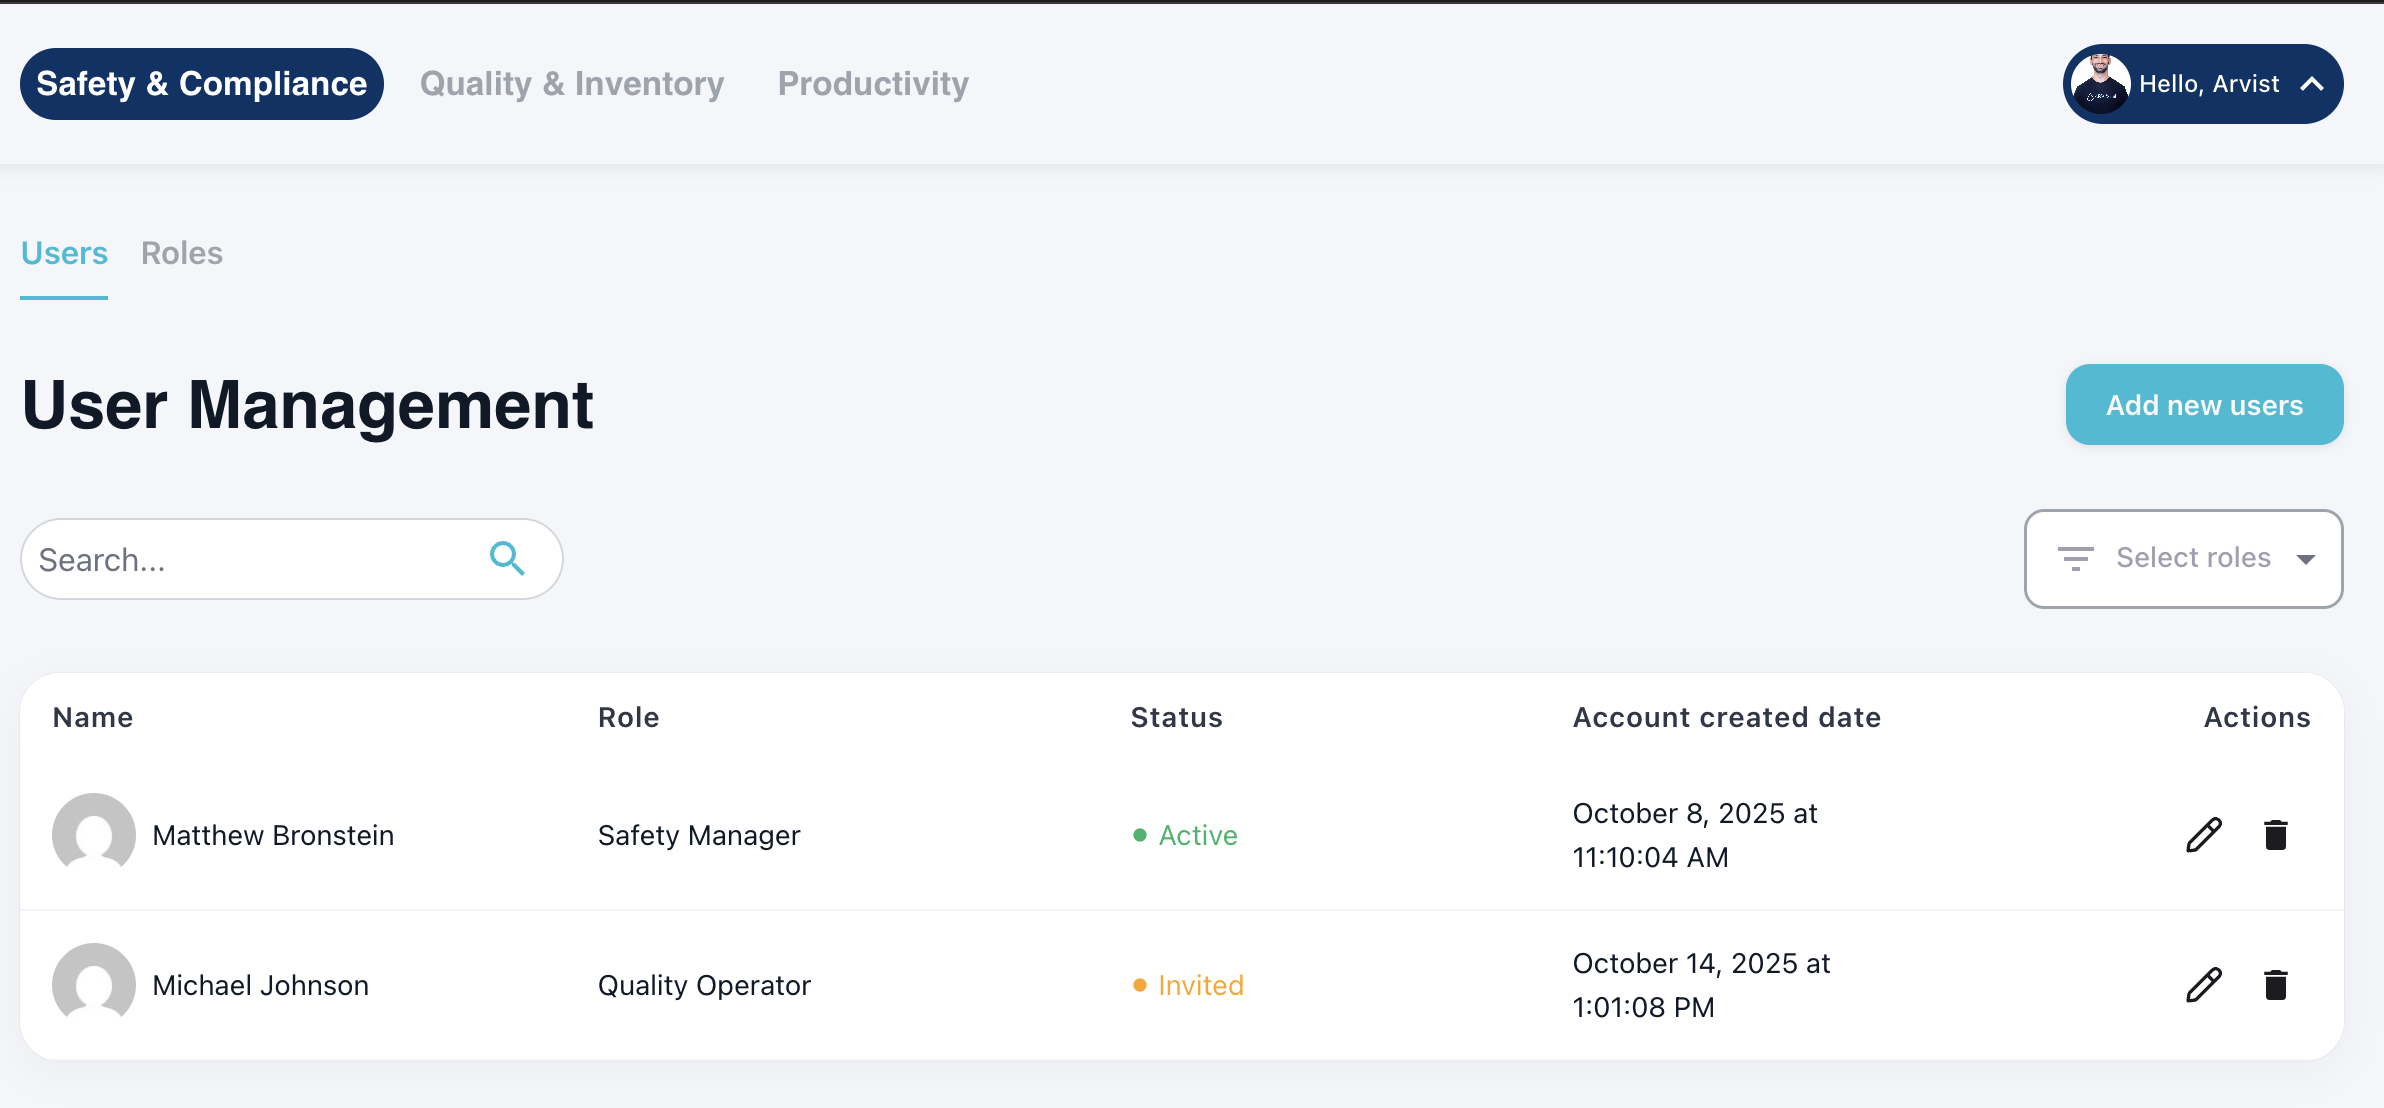
From this list, you can edit or delete users by clicking the respective icons under the Actions column.
Activating a User Account
When a user is invited to join the platform, they will receive an email with a link to activate their account.

NOTE: Account activation requires access to the internal network. Users can activate on-site or by connecting remotely through a VPN tunnel.
Clicking the button will open the web browser and direct the user to activate their account by creating a password.
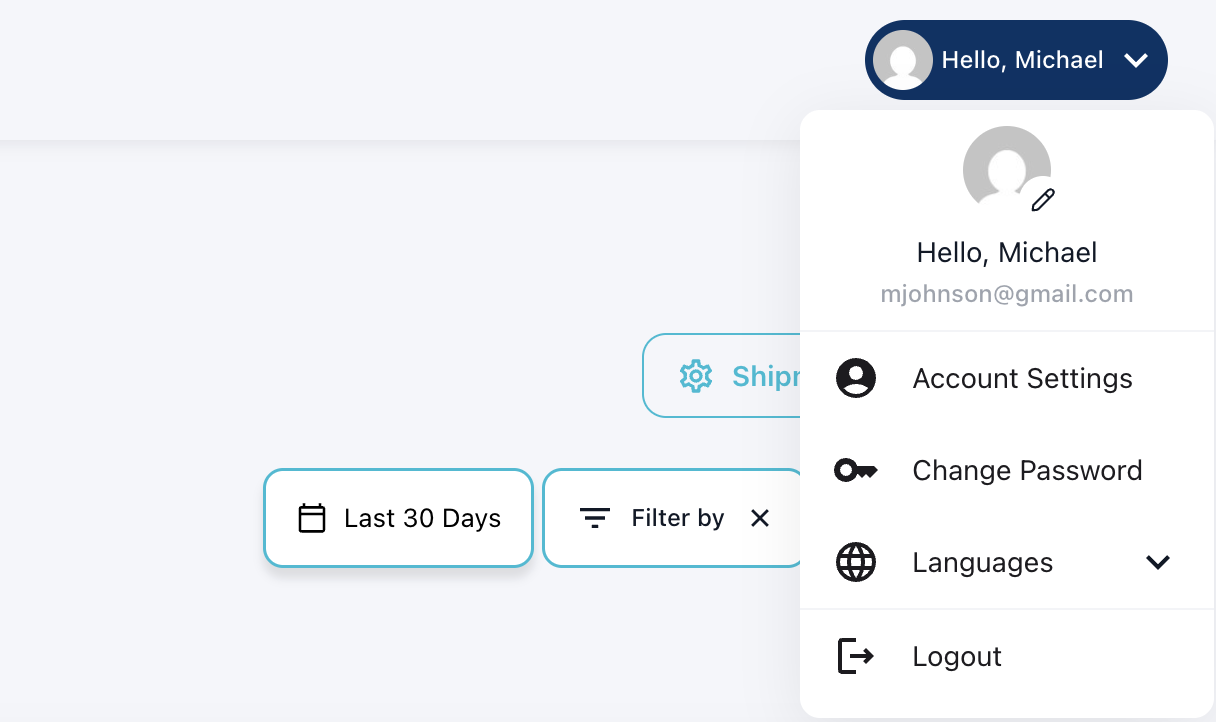
After activating their account, they will be able to login with their email and password to access the dashboard. They can also view and edit their profile information, including adding a profile picture, in the top right nav-bar dropdown. They can also change their password, set a language preference, and logout from here.
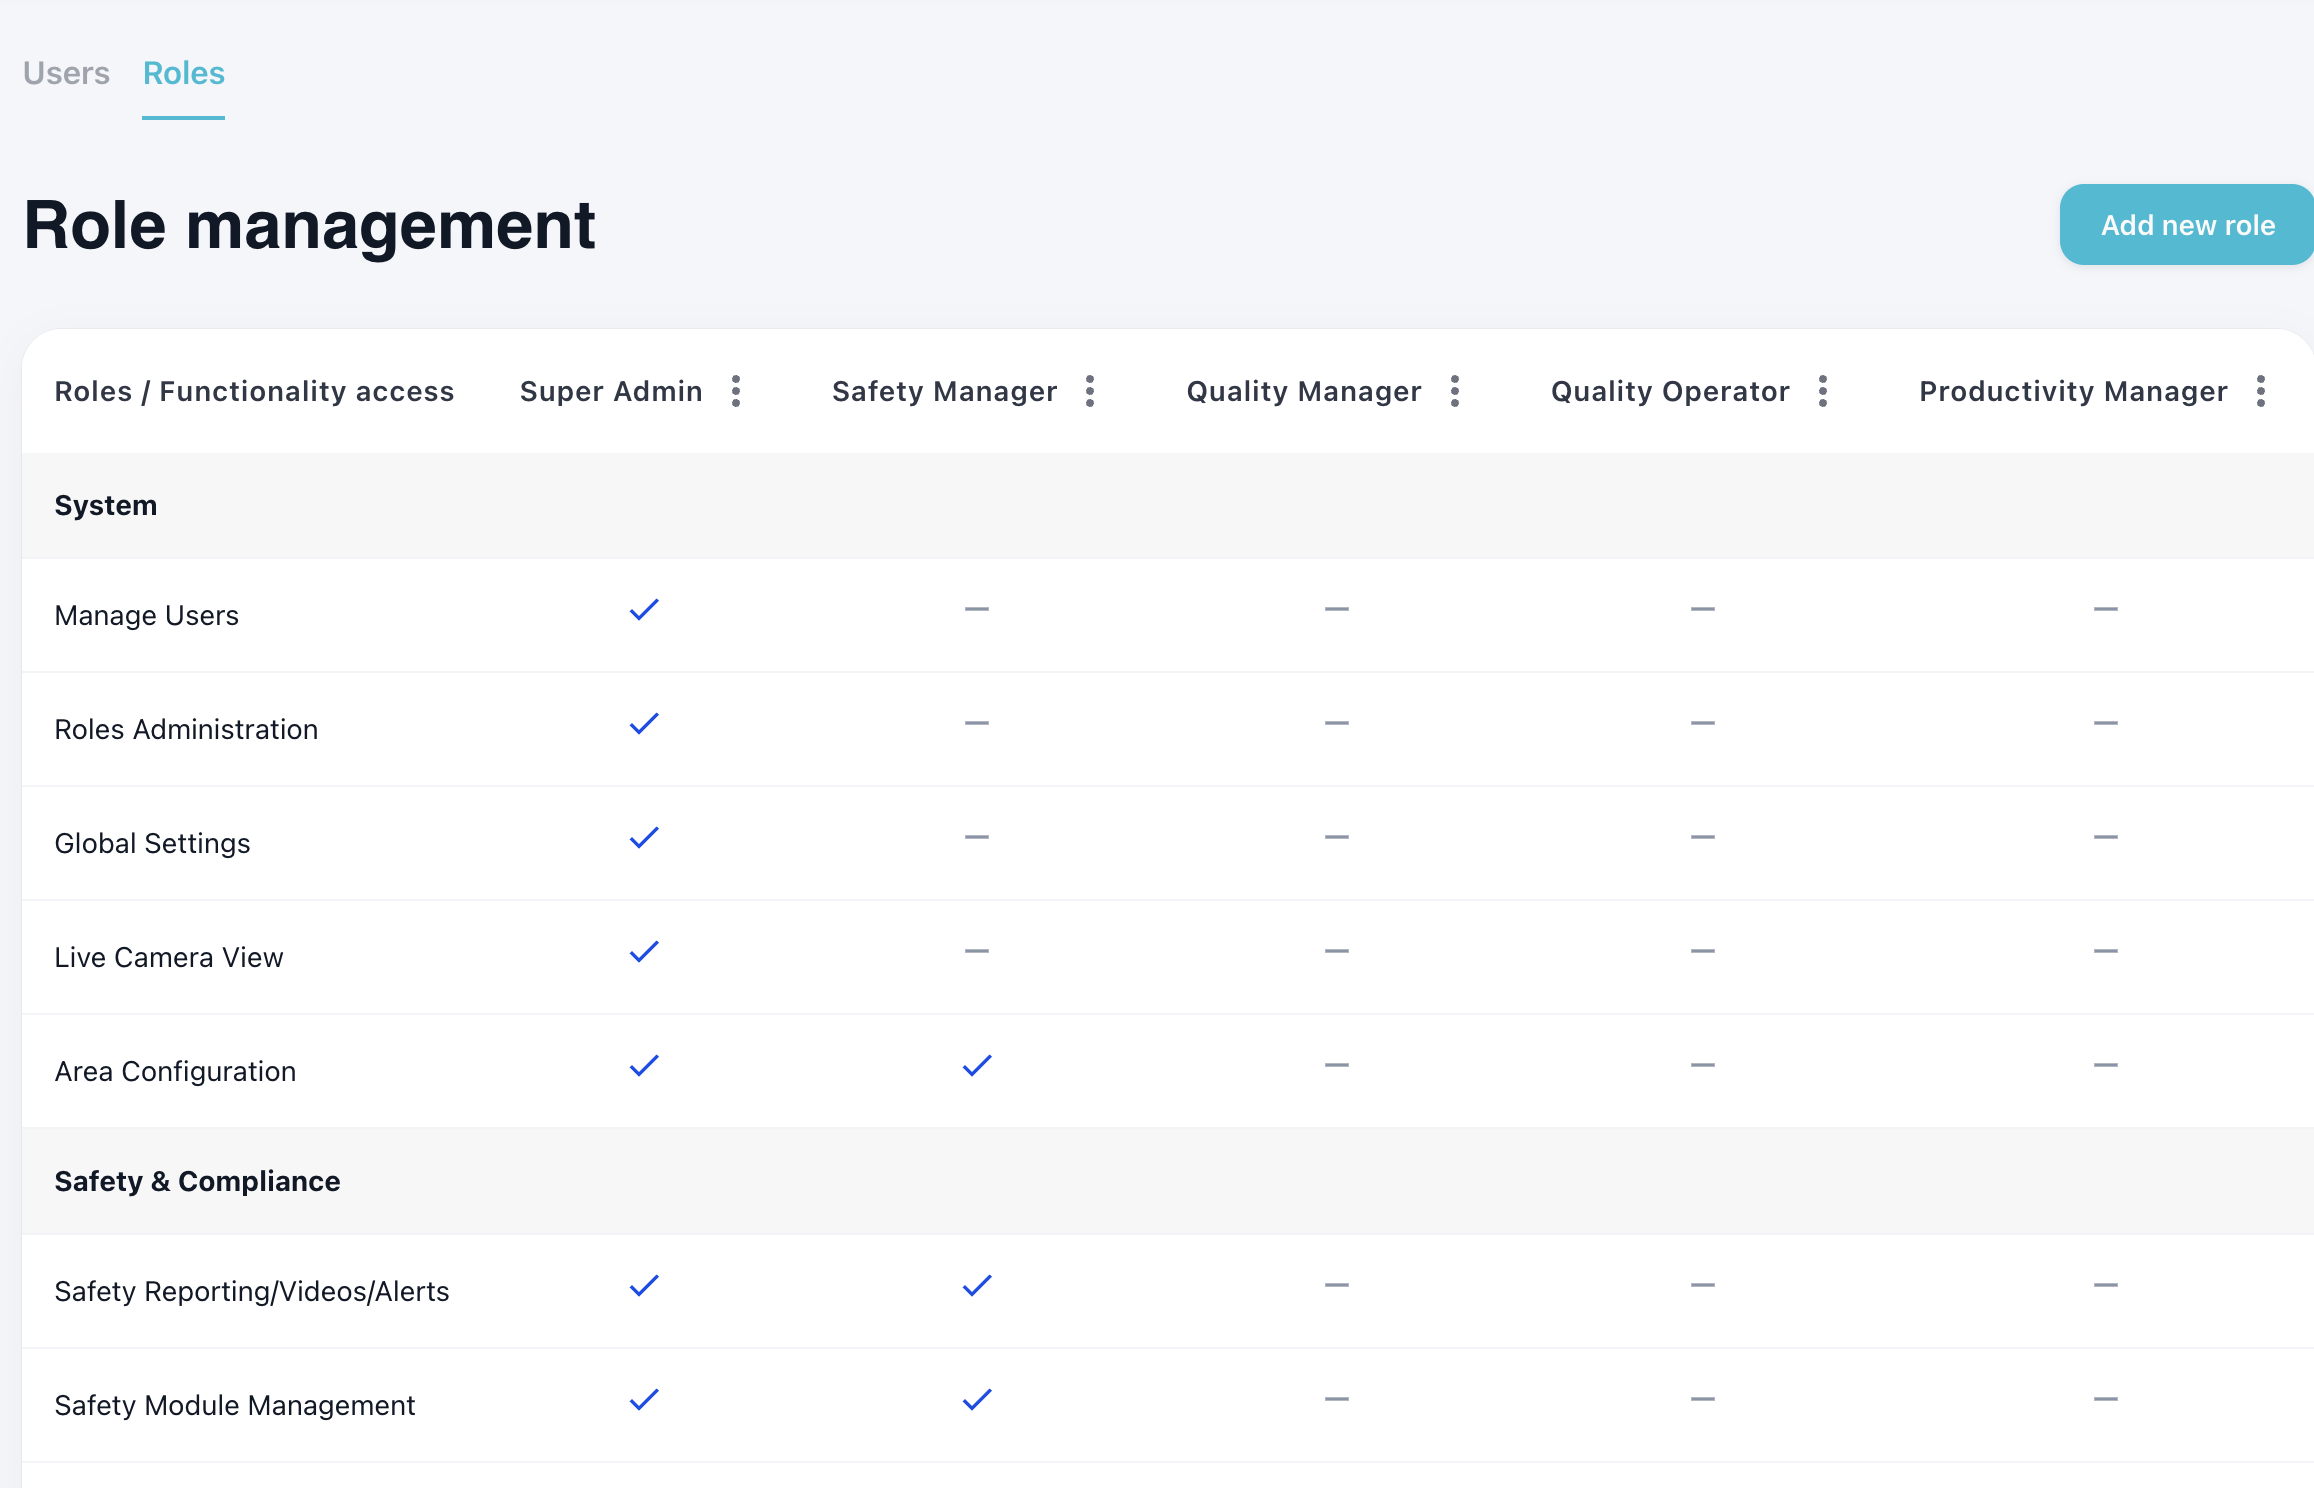
Roles Page
The roles page lists all roles (top column) and their applicable permissions (presented in a series of rows on the left). Any permissions that are related to a specific role will have a checkmark. Each permission is also organized by feature (i.e. System, Safety & Compliance, etc.).
Understanding Roles and Permissions
Arvist's Role-Based Access Control (RBAC) system allows administrators to create custom roles with specific permission sets tailored to your organization's needs. Each role can be assigned multiple permissions across different feature categories.
Permission Categories
Permissions are organized into the following feature categories:
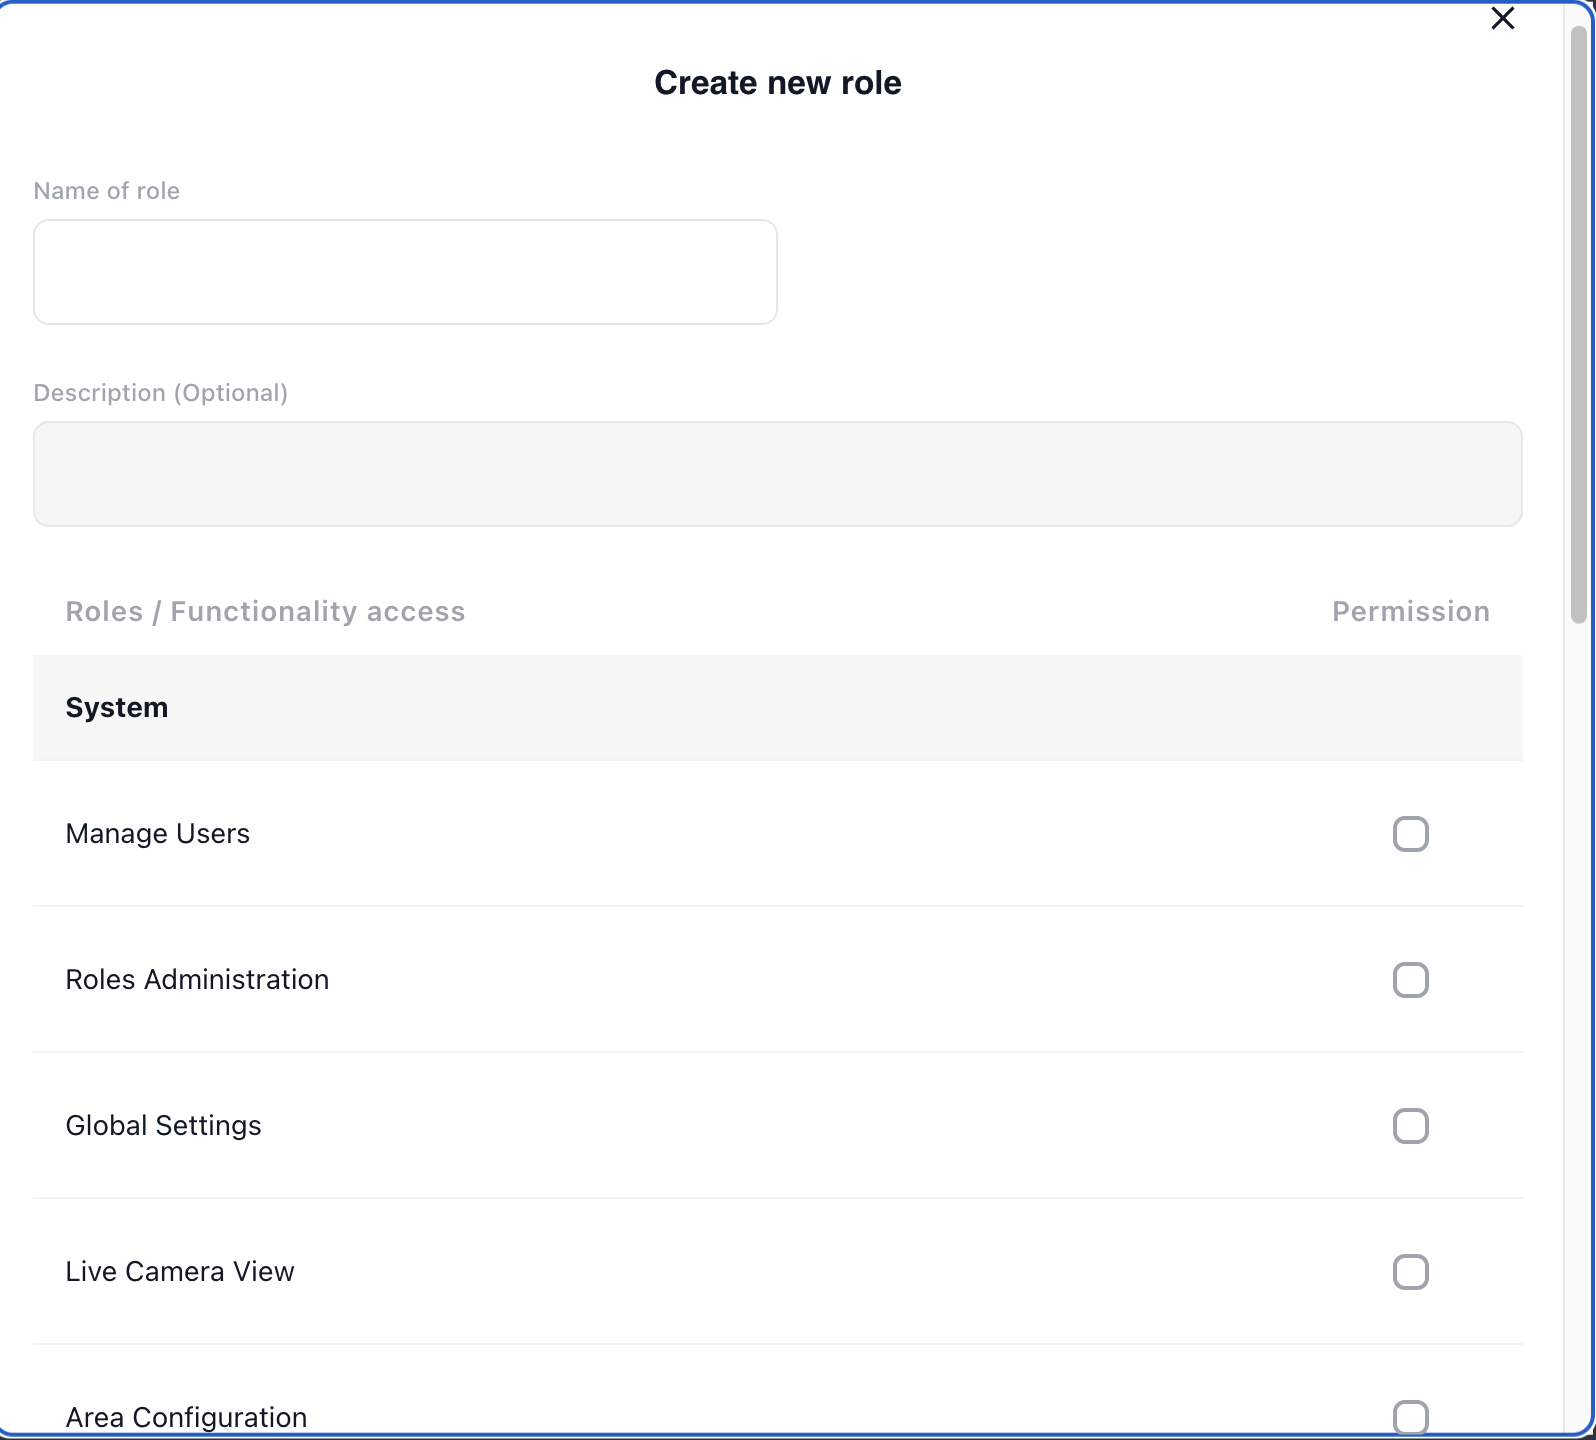
System Permissions
- User Management: Create, edit, delete users and manage role assignments
- Global Settings: Configure system-wide settings and preferences
- Network Configuration: Manage network settings and connectivity
General Permissions
- Area Management: Create, edit, and delete areas within the facility
- Zone Management: Define and manage detection zones for cameras
- Module Management: Create, edit, and configure detection modules
- Camera Management: Add, configure, and manage camera views
- Storage Management: Configure storage settings and retention policies
Safety & Compliance Permissions
- Dashboard Access: View safety dashboards and analytics
- Incident Video Access: View and manage incident videos
- Incident Report Management: Create, edit, and export incident reports
- Rate Detection Configuration: Configure detection rate thresholds
- Video Retention Settings: Manage video retention policies
- IoT Integration Management: Configure third-party IoT device integrations
Quality & Inventory Permissions
- Shipment Inspection: Perform and manage shipment inspection workflows
- Quality Checks: Enable and configure quality check modules
- WMS Integration: Configure warehouse management system integrations
Productivity Permissions
- Worker Active Time Access: View worker activity and time tracking data
- Productivity Settings: Configure productivity tracking parameters
- Worker Information Management: Manage worker profiles and tracking codes
Creating a New Role
To create a custom role:
- Navigate to the Roles tab on the User Management page.
- Click + Add new role in the top right corner.
- Enter a Role Name (e.g., "Warehouse Supervisor", "Quality Inspector").
- Select the permissions you want to assign to this role by checking the boxes in the appropriate rows.
- Click Save to create the role.
Editing an Existing Role
To modify permissions for a custom role:
- Navigate to the Roles tab.
- Click on the role name or the edit icon for the custom role you want to modify.
- Check or uncheck permissions as needed.
- Click Save to update the role.
NOTE: Default system roles cannot be edited. Only custom roles that you have created can be modified.
IMPORTANT: When a user's role or permissions are changed, they will be automatically logged out and required to re-authenticate. This ensures that their new permission scope takes effect immediately and securely.
Deleting a Role
To delete a custom role:
- Navigate to the Roles tab.
- Click the delete icon next to the custom role you want to remove.
- Confirm the deletion in the popup dialog.
NOTE: Default system roles cannot be deleted. Only custom roles can be removed. Additionally, you cannot delete a role that is currently assigned to active users. You must first reassign those users to different roles before deleting.
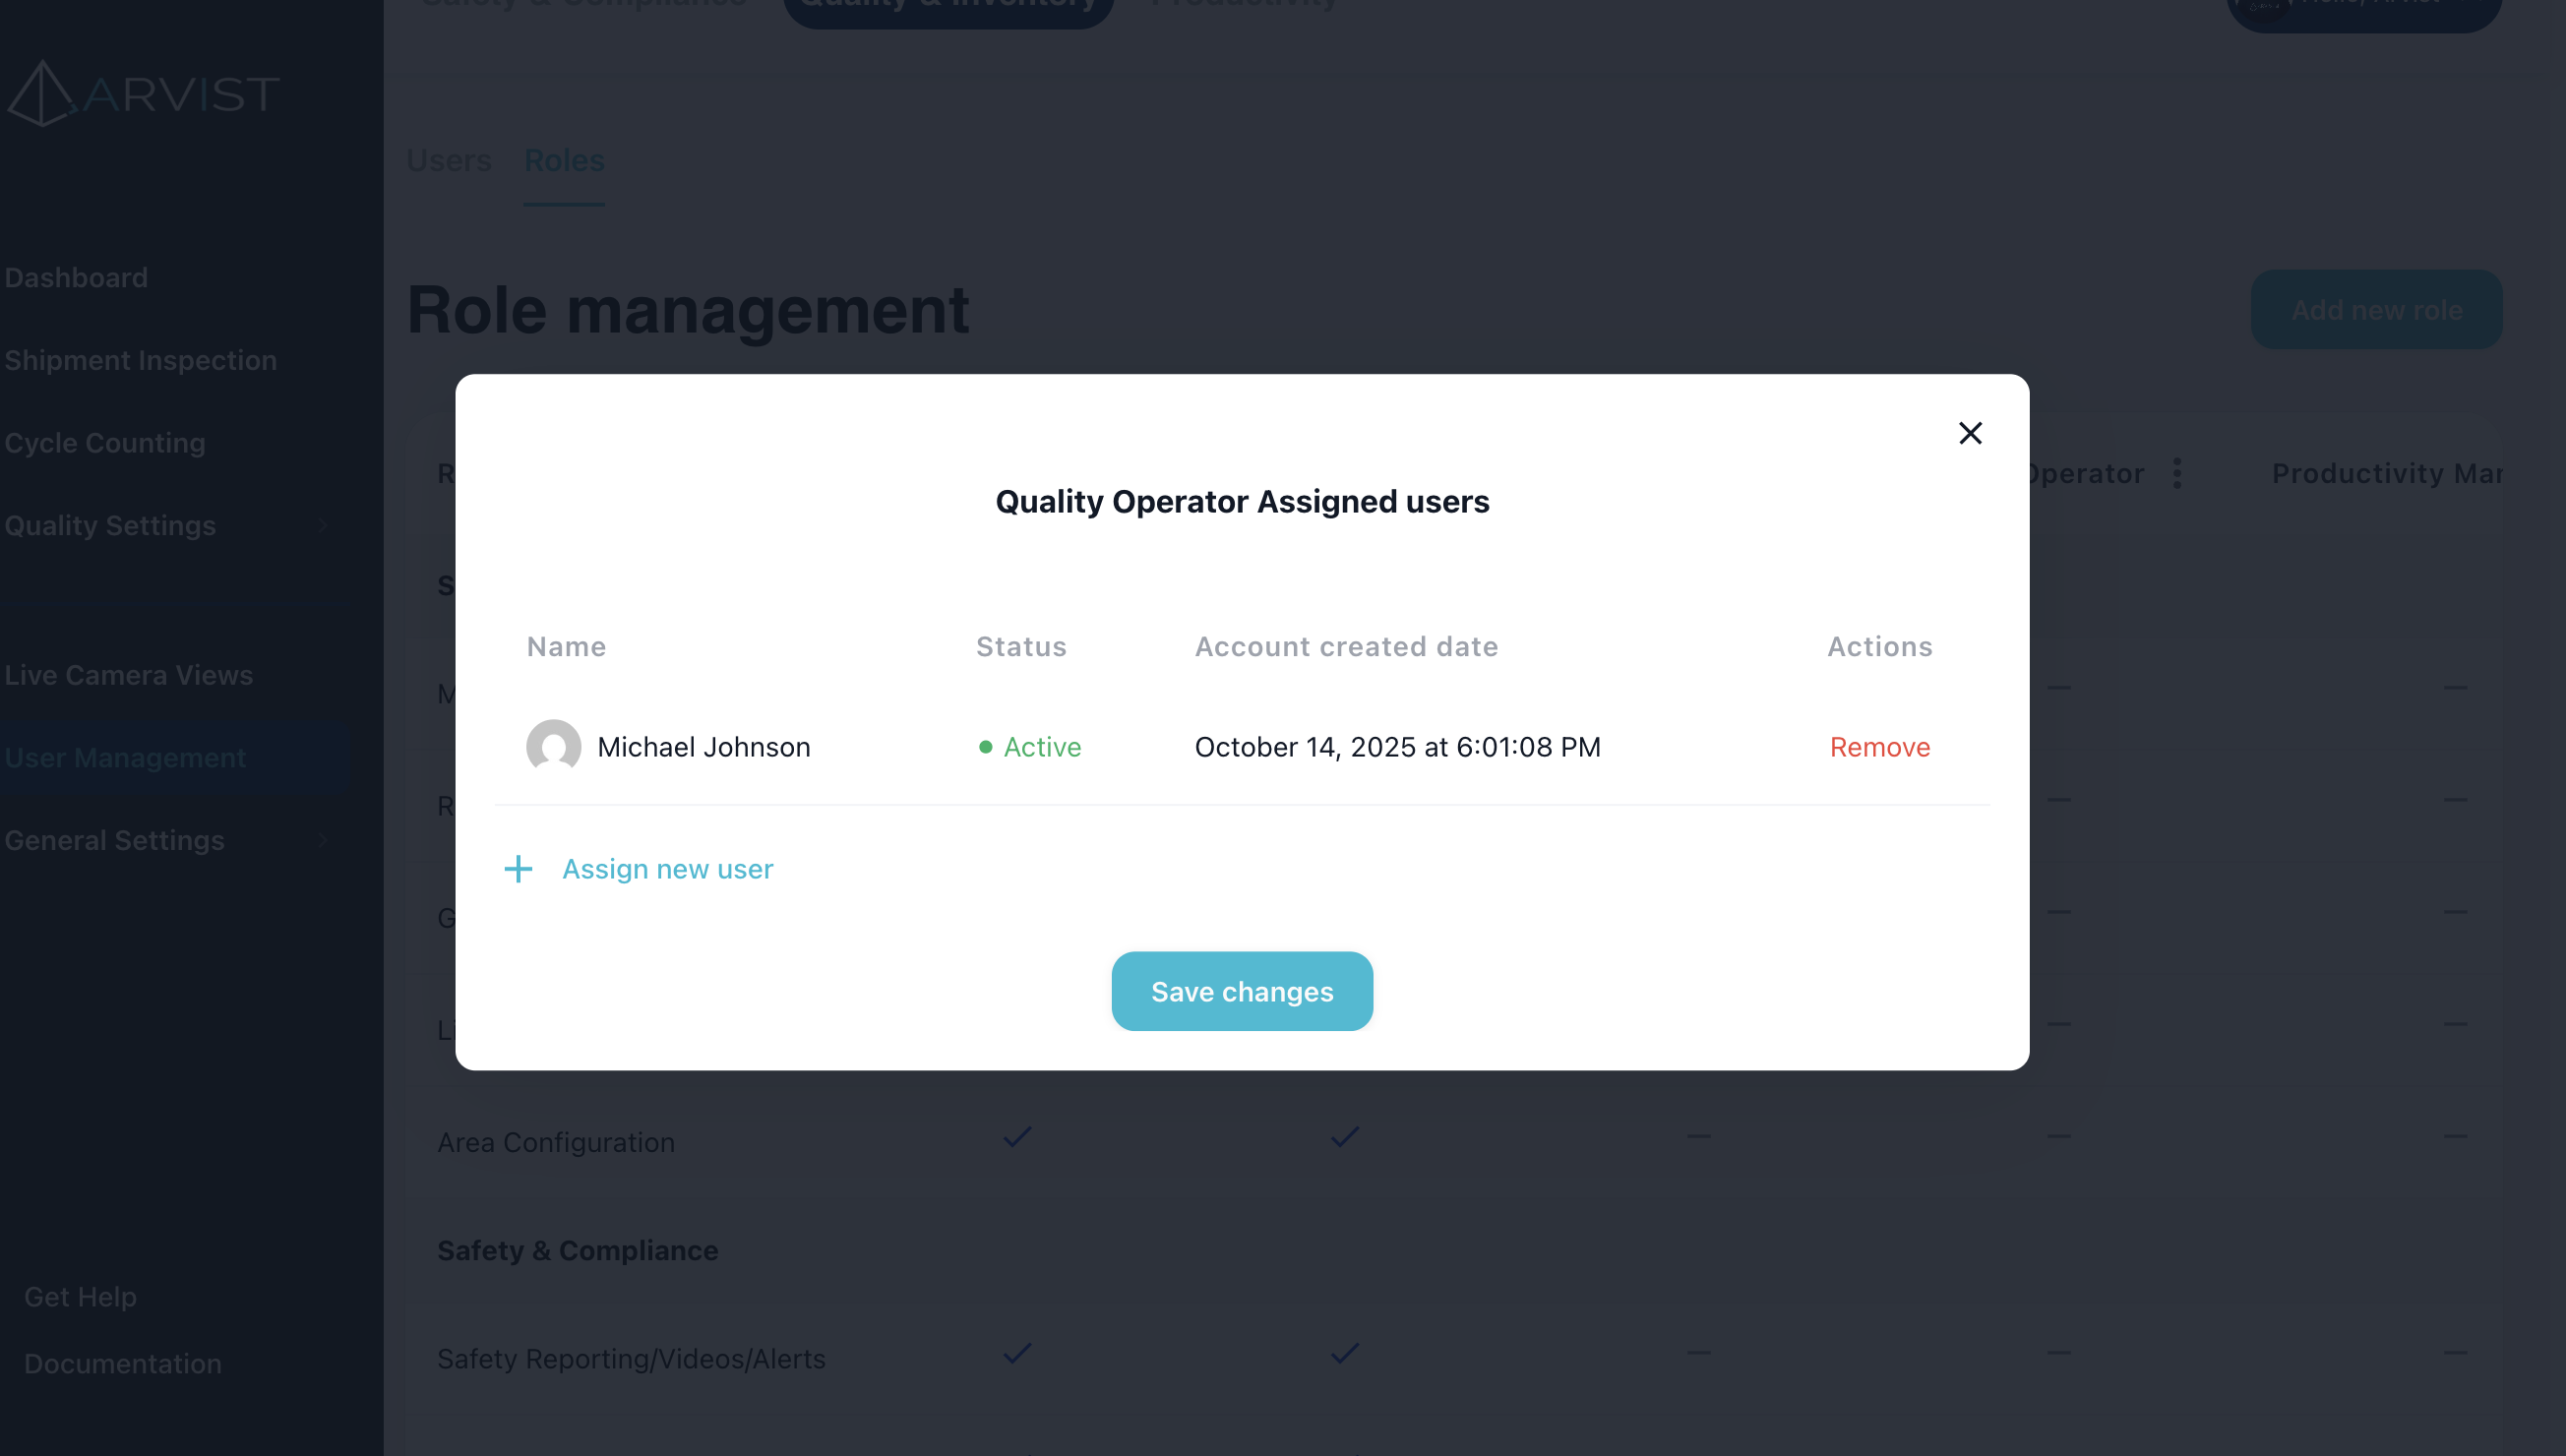
View Users
Users assigned to a specific role can be viewed from the dropdown option for that role. In this popup, users can also be added or removed from this role in bulk.
Assigning Multiple Roles to a User
Users can be assigned multiple roles to provide overlapping permissions. This is useful when a user needs access to features across different departments or functions.
When a user has multiple roles:
- They receive the combined permissions from all assigned roles
- If any role grants a specific permission, the user will have that permission
- This allows for flexible permission management without creating numerous single-purpose roles
IMPORTANT: When modifying a user's assigned roles, they will be automatically logged out and required to re-authenticate to obtain their new permission scope.
Best Practices for Role Management
- Principle of Least Privilege: Assign users only the minimum permissions they need to perform their job functions.
- Role Naming: Use clear, descriptive names that indicate the role's purpose (e.g., "Safety Manager", "Dock Operator").
- Regular Audits: Periodically review role assignments to ensure users have appropriate access levels.
- Role Consolidation: Create reusable roles that can be combined, rather than creating overly specific roles for each user.
- Documentation: Maintain documentation of what each role is intended for and which job titles should receive which roles.
- Coordinate Changes: When updating user permissions, notify the affected users in advance so they're aware they'll need to log back in.