Shipment Inspection
Choosing a shipment
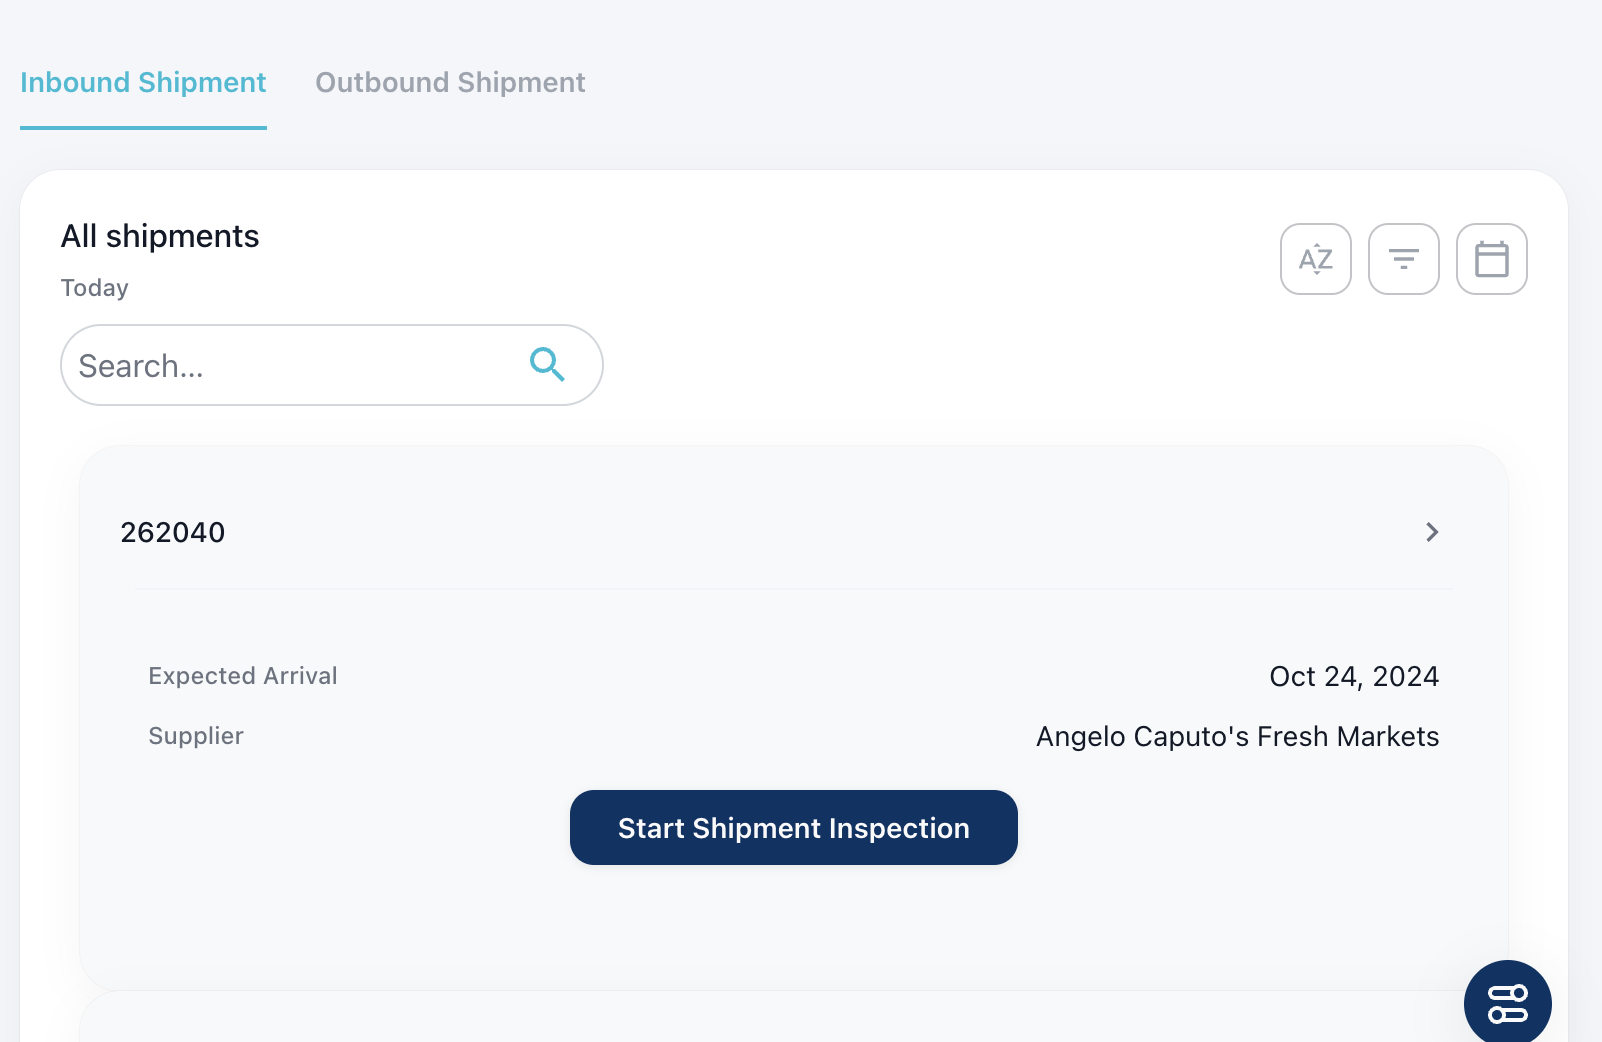
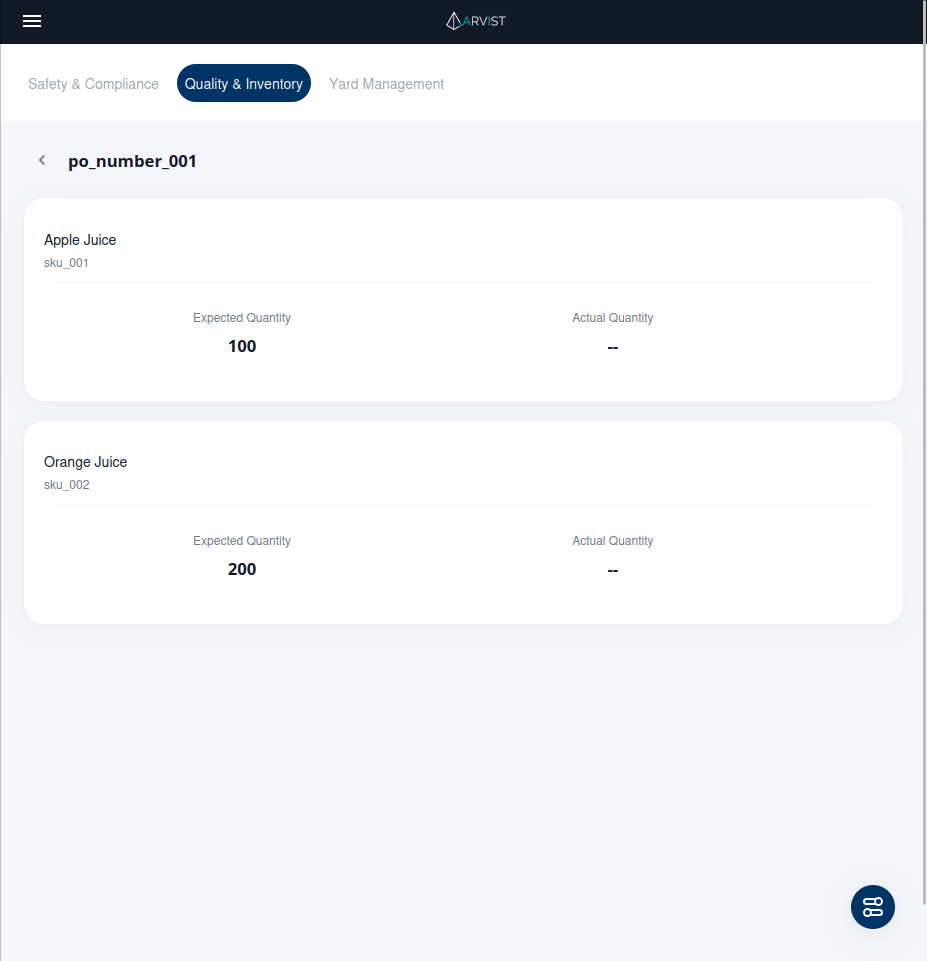
Begin by choosing the shipment to process. The shipments are queried from the WMS system and displays the purchase order (PO) numbers for the expected inbound and outbound shipments, as well as the expected arrival date and supplier for outbound shipments and ship date and customer for outbound shipments. Toggle between inbound and outbound shipments at the top of the page. Clicking the arrow to the right of the PO number connects to a page that displays the product name, sku, expected quantity and actual quantity (available after the shipment is processed). Begin processing a shipment by clicking the Start Shipment Inspection button associated with the PO to process. A popup will display to give an overview of the shipment inspection procedures. Optionally, select Don't show this message again to no longer receive the popup. Click Start Counting to begin.
Shipment Inspection Homepage
Shipment Products Page
Sorting and Filtering Shipments
The Shipment Inspection main page provides several filtering and sorting options to help you find and manage shipments efficiently.
Sort Options
Click the Sort button to choose how shipments are ordered:
- Sort by A-Z: Alphabetically by order/PO number (ascending)
- Sort by Z-A: Reverse alphabetically by order/PO number (descending)
- Latest to earliest: Newest shipments first (by created date)
- Earliest to latest: Oldest shipments first (by created date)
Your sort preference is saved and will be retained for future sessions.
Filter Options
Shipment Status Filter
Filter shipments by their inspection status:
- All: Show all shipments regardless of status
- Uninspected: Shipments that have not been processed yet
- Inspected: Completed shipments
- In progress: Shipments currently being inspected
Damage Status Filter
Filter by damage detection results (requires Quality Checks enabled):
- All damages: Show all shipments regardless of damage status
- Damaged Detected: Shipments with unresolved damages
- Damaged Resolved: Shipments where damages have been marked as resolved
- No Damage Detected: Shipments with no damages found
Counting Status Filter
Filter by product count matching (requires Product Count enabled):
- All counting status: Show all shipments
- With Mismatched: Shipments where product counts don't match expected quantities
- Without Mismatched: Shipments where counts match expected quantities
Quality Station Filter
Filter shipments by the quality station where they were or will be inspected:
- All quality stations: Show shipments from all stations
- Select a specific quality station to show only shipments associated with that station
Date Range Filter
Filter shipments by date:
- Today: Shipments from today only
- Last X days: Shipments from the past X days
- Custom date range: Select a specific start and end date
Your selected filters are saved and will be retained for future sessions.
Search
Use the search bar to find specific shipments by order number, PO number, or other identifying information.
Shipment Inspection Settings
Before starting an inspection, you can configure settings that determine how the inspection will be performed. Click the Settings icon on the main Shipment Inspection page to access these options.
Device Selection
Choose how the inspection will be performed:
Quality Station Inspection
- Uses a configured quality station with fixed cameras or a mobile device
- Requires a quality station to be selected
- Enables automated or semi-automated inspection workflows
External Device
- Uses an external device connected via MQTT
- The device must be connected and ready before starting
- Suitable for custom inspection hardware integrations
Quality Station Selection
When Quality Station Inspection is selected, choose which quality station to use:
- Click the Quality Station dropdown
- Select from available quality stations
- Each option shows the station name and type (e.g., "Receiving Dock 1 - Stationary")
- See Quality Stations for more information on Quality Stations.
- The selected quality station determines:
- Which cameras or image sides will be used
- What inspection types are enabled (quality checks, product count)
- The workflow for capturing images
NOTE: If Product Count with Item Count is enabled, the system will automatically match detected labels with your configured label models from Label Modeling based on visual similarity.
Warehouse Location
If your WMS source is configured as ERP, you'll also see a Warehouse Location selector. Choose the appropriate location for this inspection.
Applying Settings
After configuring your preferences:
- Click Apply to save the settings
- Your settings are saved for future inspections
- Click Back to cancel changes
Starting an Inspection
After configuring your settings, you're ready to start inspecting a shipment.
There are 3 main ways to start an inspection:
- Start Inspection from list of shipments (requires WMS connectivity)
- Start Inspection without WMS connectivity by clicking Start Inspection at top of page
- Hit
POST /api/inspection/shipmentwith shipment data and desired Quality Station Name asarea_name.
No WMS
If you don't have WMS connectivity, you can still start an inspection by clicking Start Inspection at the top of the page. This will allow you to either manually enter shipment order numbers and proceed with the inspection or extract order number information from pallet labels during the inspection.
NOTE: No WMS inspections can only be performed for pallet-level inspections, i.e. photo documentation, damages, or load verification. Counting is disabled without WMS connectivity due to the lack of line item data.
NOTE: The desired pallet labels must be configured in the Label Modeling section and must be visible on the pallet during the inspection when selecting option to extract order numbers automatically.
When extracting order numbers from the pallet labels, if the order numbers are not detected, the system will prompt you to manually enter the order numbers.
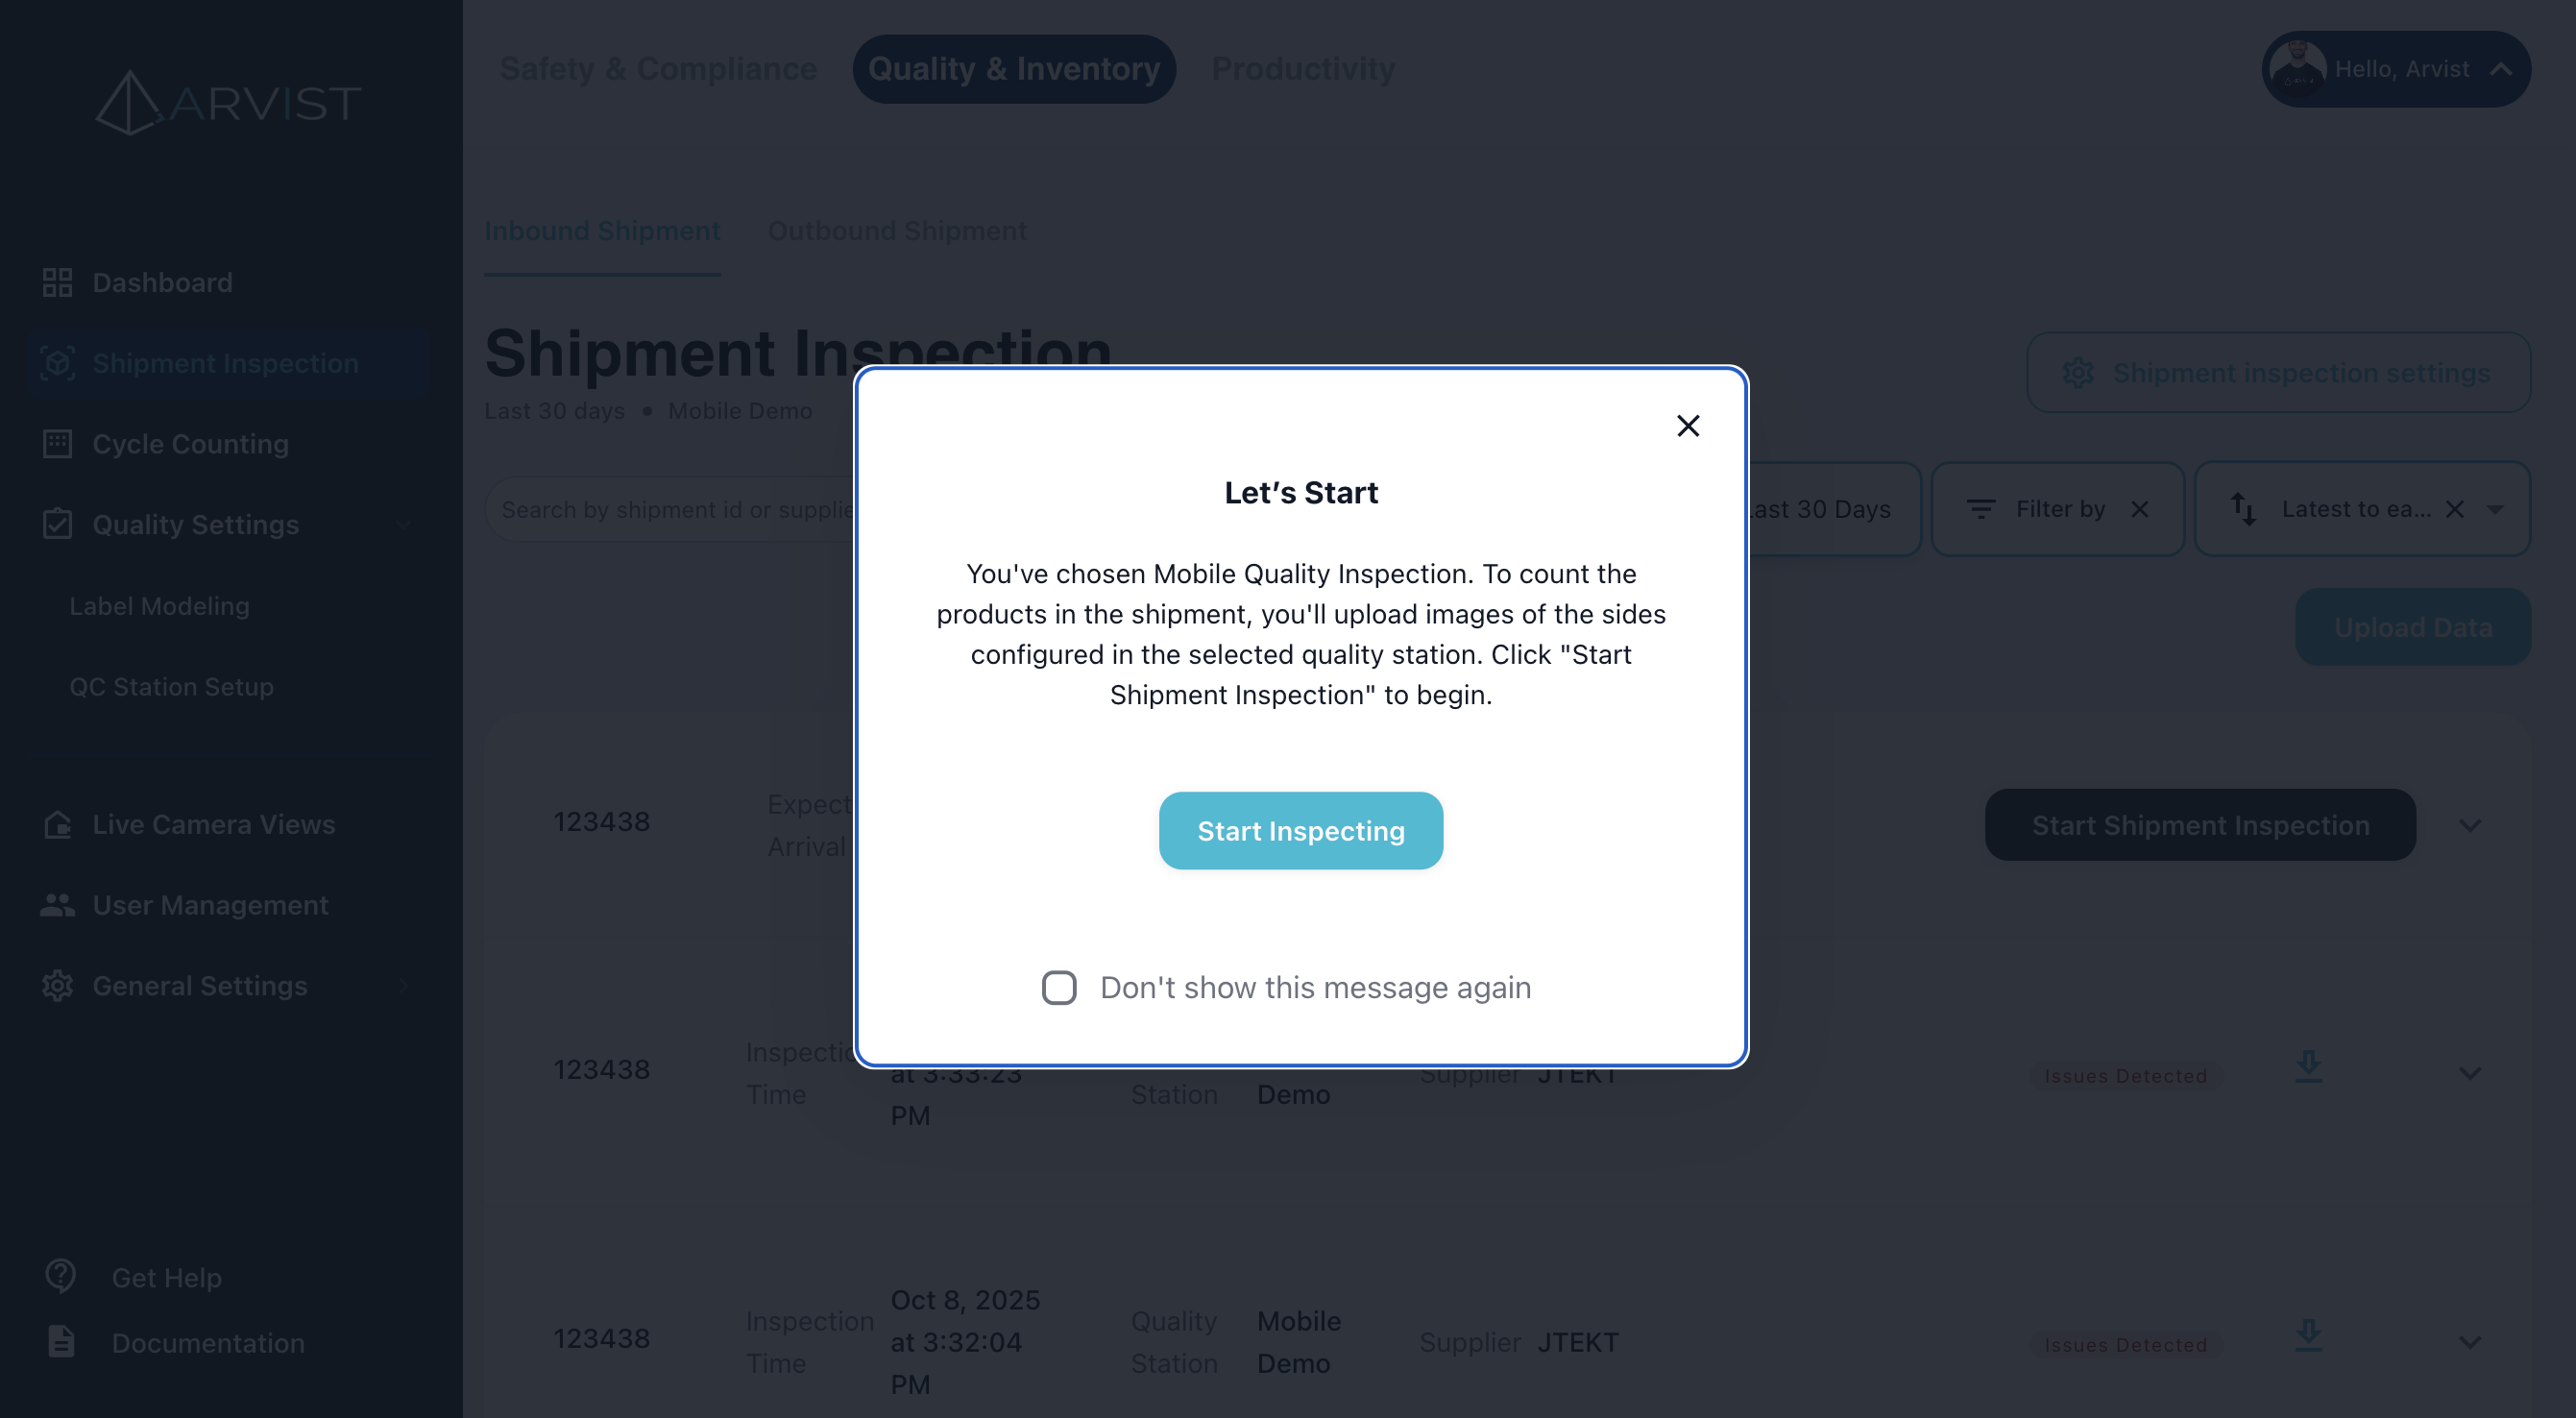
The "Let's Start" Popup
When you click Start Shipment Inspection on a shipment, a popup will appear with instructions specific to your selected device and quality station:
For Mobile Quality Inspection
"You've chosen Mobile Quality Inspection. To count the products in the shipment, you'll upload images of the sides configured in the selected quality station. Click 'Start Shipment Inspection' to begin."
For Quality Station Inspection
"You've chosen Quality Station Inspection with [Station Name] using [Station Type]. Click 'Start Inspecting' to begin."
For External Device Inspection
"You've chosen inspection by External Device. Please make sure the device is connected to mqtt and the device is ready to start the inspection. Click 'Start Inspecting' to begin."
The popup includes a checkbox labeled "Don't show this message again". Check this box if you don't want to see the popup for future inspections. You can re-enable it in your browser's local storage settings if needed.
Click Start Inspecting to begin the inspection workflow.
Processing Units
After clicking Start Shipment Inspection on the desired shipment, the workflow for processing units (pallets, cases, etc.) depends on your quality station configuration.
Quality Station Types and Image Capture
Mobile Quality Station
For mobile devices (tablets, smartphones):
- After starting the inspection, click the camera icon to capture an image of the unit
- The number of images required per unit is configured in your quality station settings
- Take clear, well-lit photos from the designated angles
- As images are captured, they appear as thumbnails for review
- If an image is unsatisfactory, click the X on the thumbnail to retake it
- After capturing all required images, the system processes the images and checks for damages (if quality checks are enabled) and product identification
- Click Continue to proceed to the next unit or view the Summary page
For the most accurate results, take pictures straight-on to each side of the unit, ensuring the entire unit is visible in the frame.
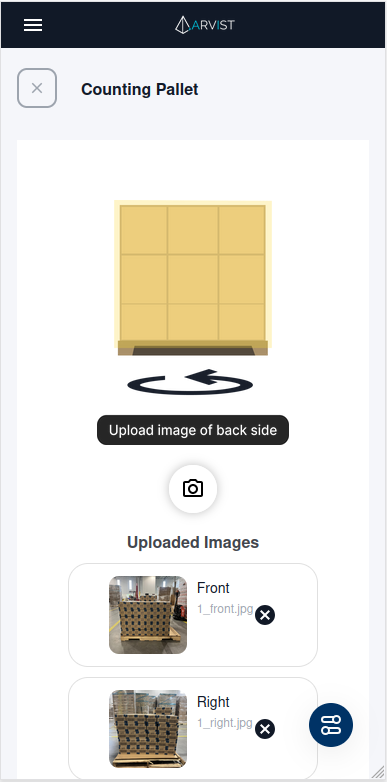
TIP: At any point during image capture, the X button in the top left will cancel the current unit from the shipment inspection.
Stationary and Packing Table Quality Stations
For stationary quality stations with mounted cameras:
- After starting the inspection, you are automatically taken to the Summary page
- Position the unit in front of the mounted camera(s)
- Click the Capture Images button to trigger the mounted cameras
- The system automatically captures images from all configured camera angles
- The system processes the images and checks for damages (if quality checks are enabled) and product identification
- Repeat for additional units
Turntable Quality Station
For turntable setups with automated rotation:
- After starting the inspection, before loading any units, ensure the turntable is ready (follow the state indicators in the UI)
- Load a unit onto the turntable when state indicators dictate
- The system automatically detects when the unit is loaded
- Start the turntable rotation when state indicators dictate (controlled manually or by external automation)
- As the unit rotates, the system automatically captures images from all sides using the mounted camera
- The system processes the images and checks for damages (if quality checks are enabled) and product identification
- Repeat for additional units
NOTE: The Arvist application does not control turntable rotation. You must manually control the turntable or use external automation.
Conveyor Quality Station
For conveyor belt setups:
- After starting the inspection, the system will initiate cameras streams and begin monitoring the conveyor (follow the state indicators in the UI)
- Place units on the conveyor belt once state indicators show ready (must wait for camera streams to initialize)
- As each unit moves into the camera's field of view, the system automatically captures images
- The system processes images and checks for damages (if quality checks are enabled) and product identification as units pass through
- Continue placing units on the conveyor as needed
NOTE: Ensure units are properly spaced on the conveyor to allow clear image capture of each unit.
Image Processing
After images are captured for each unit, the system immediately processes them to:
- Identify products: Read SKUs and quantities from case labels (if enabled)
- Detect damages: Check for any quality issues if Quality Checks module is enabled
- Count products: Compare detected products against expected shipment data
- Load Verification: Ensure the expected pallet is loaded to the correct door
You'll see loading indicators for:
- Damage Detection (if quality checks are enabled)
- Product Identification (if product count from case labels is enabled)
- Extracting Pallet Data (if pallet data extraction OR load verification is enabled)
If any issues are detected during processing, popups will appear requiring your action before continuing. See the sections below for handling these scenarios.
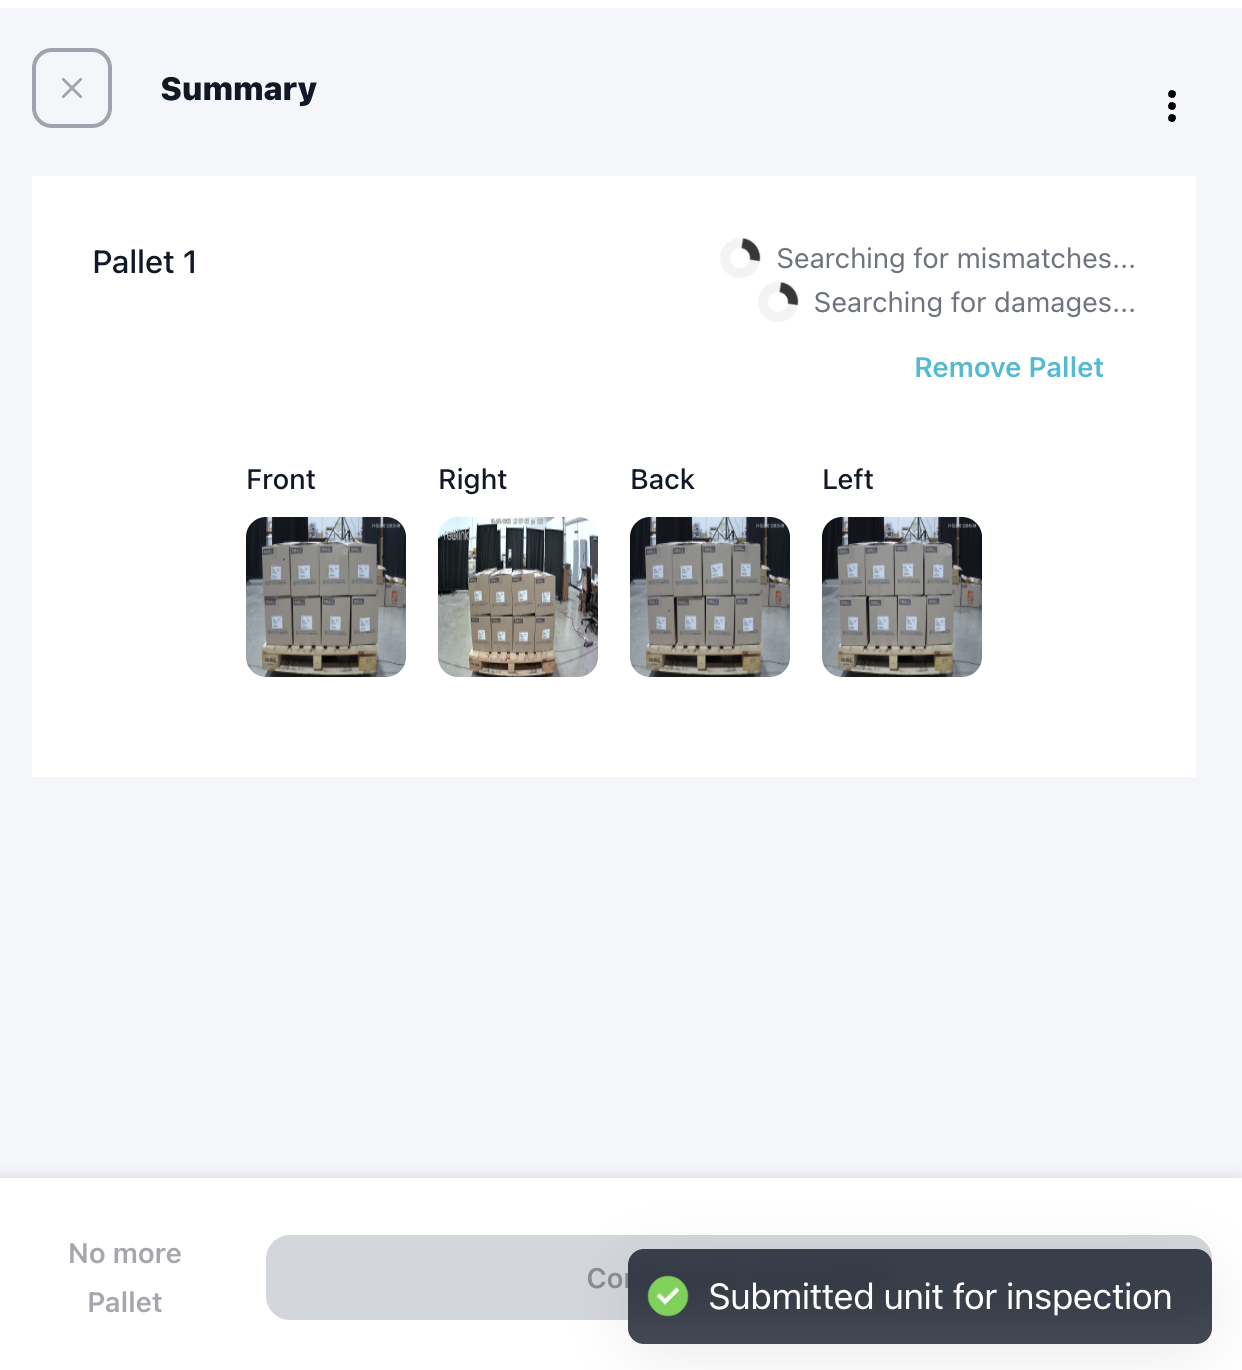
Summary Page
The Summary page displays each of the processed units from the shipment. From this page, you can:
- View all units that have been inspected
- See processing status indicators for each unit (damage detection and product identification)
- View and resolve existing issues/alerts
- Remove a unit by clicking the Remove Unit button
- Complete the inspection by clicking No more pallets/products when ready
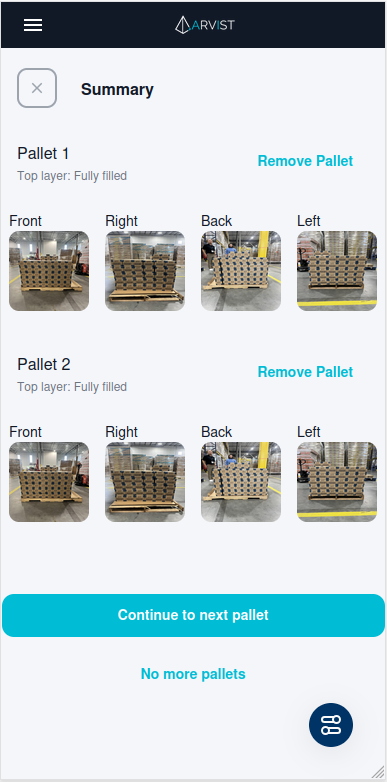
Each unit row shows:
- Loading indicators while damage detection and product identification are processing
- Status badges when processing is complete
- Any alerts or issues that require attention
Processing Additional Units:
- Mobile: Click Continue to next unit to return to the image capture screen
- Stationary/Packing Table: Position the next unit and click Capture Images again
- Turntable: Load the next unit - the system automatically detects and processes it
- Conveyor: Place the next unit on the belt - the system automatically captures and processes it
Completing the Inspection:
The No more pallets/products button will be disabled while any unit images are still being processed OR any outstanding issues/alerts. Once all processing is complete, the button will become enabled and you can click it to proceed to the Final Count Page.
NOTE: All issues must be resolved before completing the inspection. See the next section for handling detected issues.
Navigation Options:
- Back/X Button: Returns you to the main Shipment Inspection page. Your progress is saved and you can return by clicking the In Progress link on the shipment row.
- Cancel Shipment: Click the three vertical dots (⋮) menu and select Cancel Shipment to abandon the inspection entirely.
Handling Detected Issues
During image processing, the system may detect issues that require your immediate attention. Multiple different popups may appear after processing each unit, depending on the specific issues detected and the station configuration:
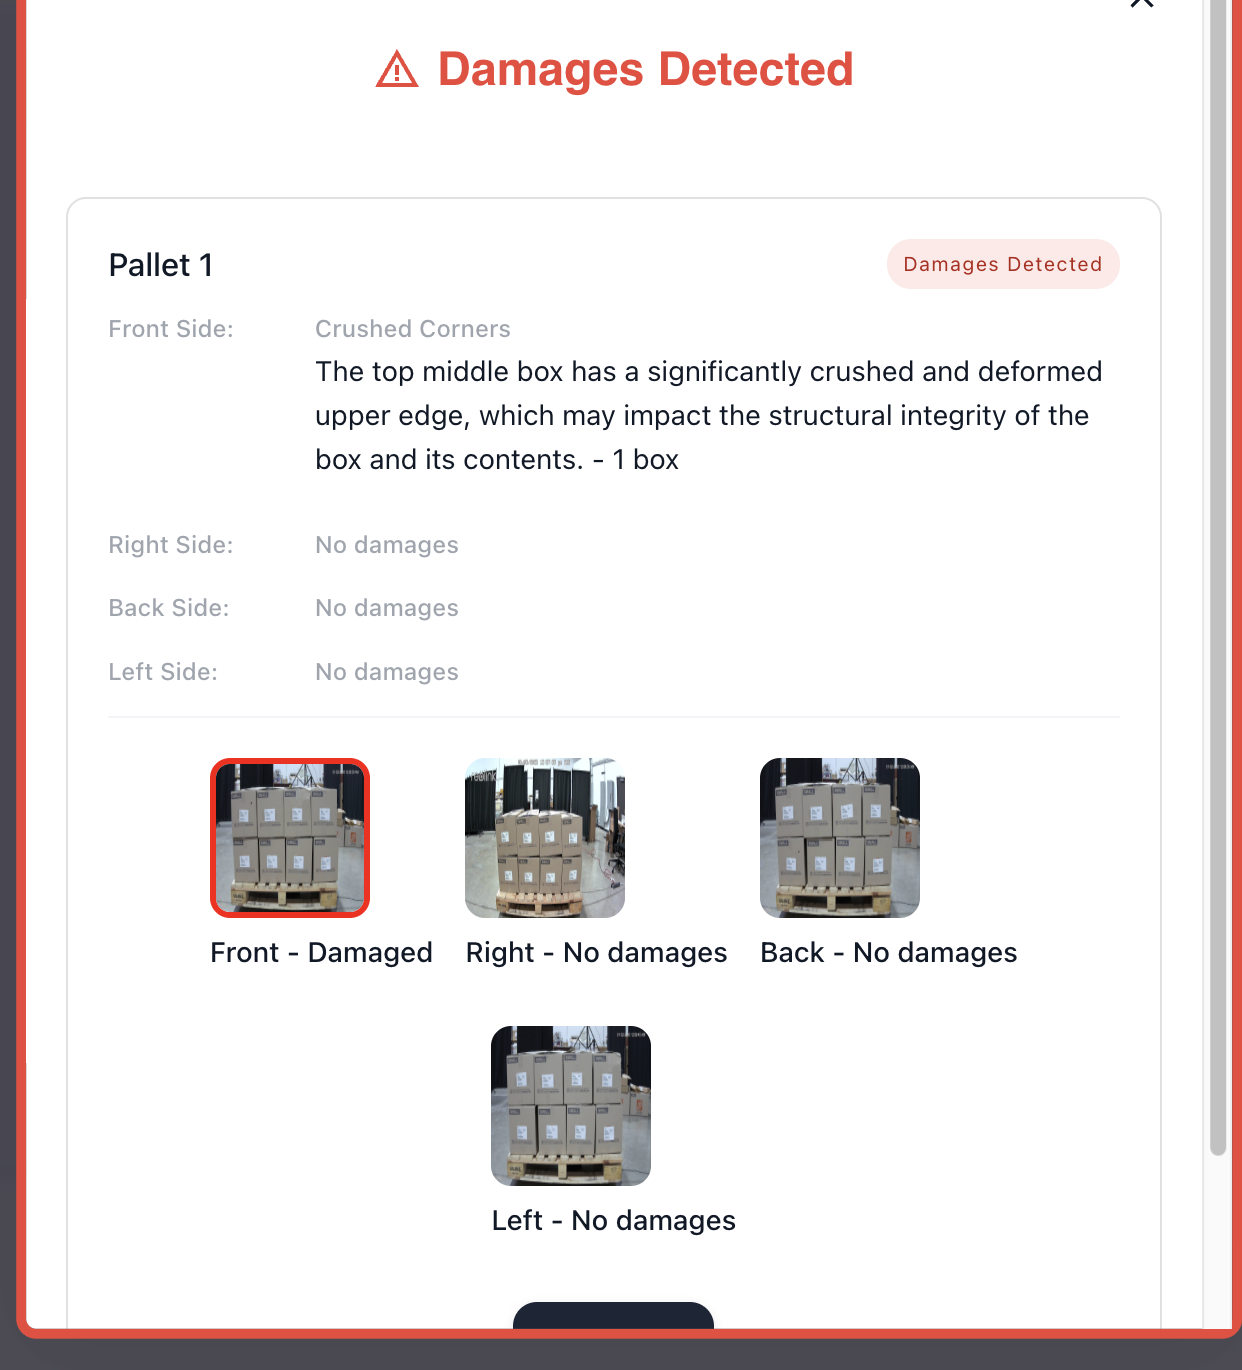
Damages Detected Popup
If the Quality Checks module is enabled and damages are detected on a unit, a popup will appear showing:
- All four images of the unit
- Images with detected damages highlighted with a red border
- The side where damage was detected
- The damage type and brief description
- The number of boxes affected (for box-level damages)
Available Actions:
- Resolve: Acknowledge the damages and continue to other units
- Re-inspect: If you need to replace damaged boxes on the unit, you can re-inspect the current unit
- Skip and Resolve Later: Continue with the inspection and address damages after completing the inspection
You can view all damages in detail from the Final Count Page after completing the inspection.
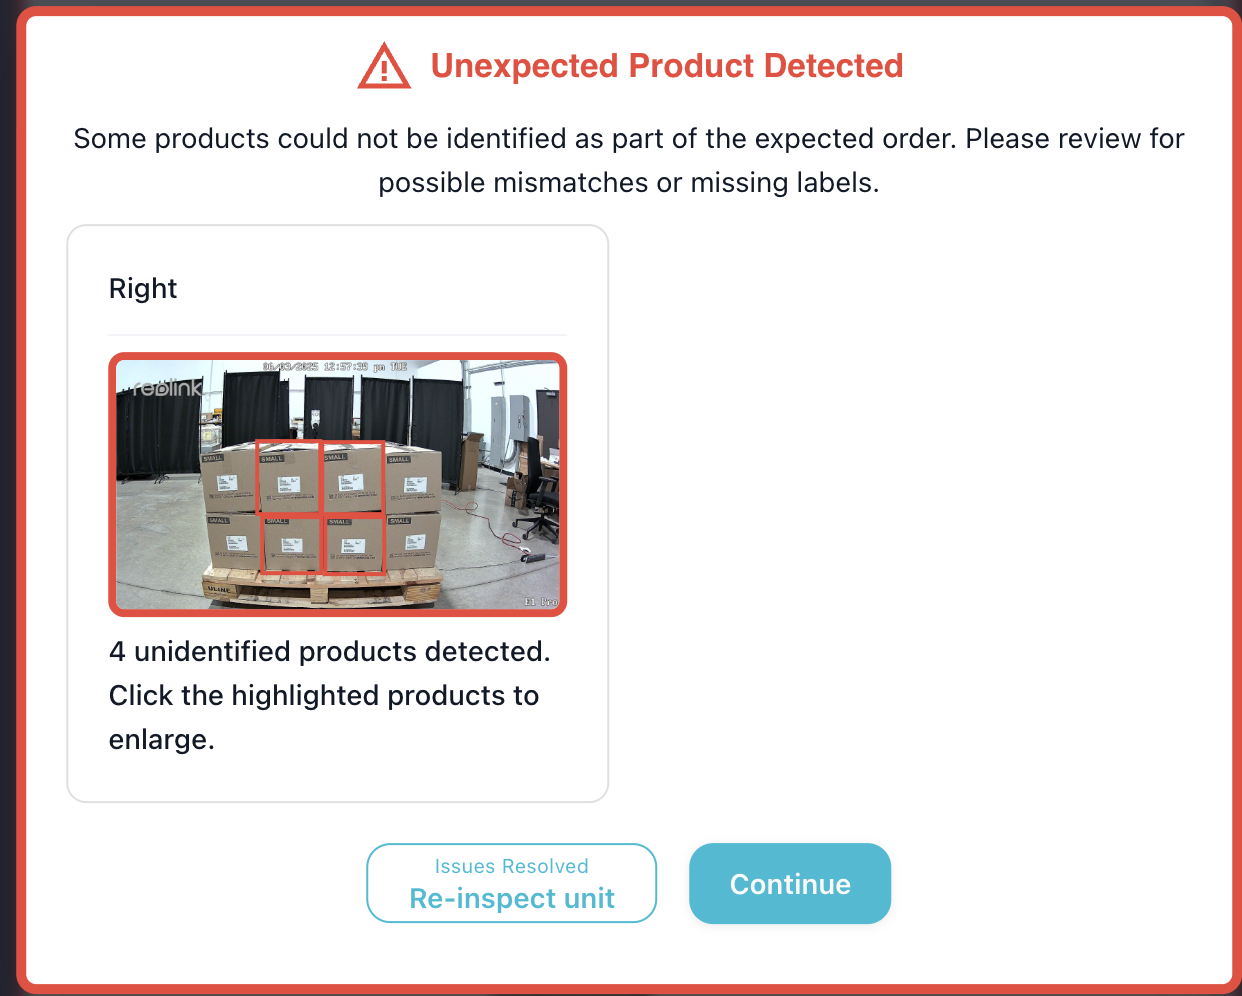
Unidentified Products Popup��
If product identification is enabled and the system detects unidentified or mismatched products, a popup will appear showing:
- Images of the unit with detected boxes outlined with overlayed squares
- Products that don't match the expected SKUs for this shipment
- Products where the SKU or quantity couldn't be read from the case label
Product Issues:
The popup displays products that fall into these categories:
- Mismatched SKUs: Products that don't belong to this shipment according to WMS data
- Unreadable SKU: The system couldn't read the product identifier from the label
- Unreadable Quantity: The system couldn't read the quantity from the case label (if item count from case labels is enabled)
Available Actions:
You can select individual boxes (shown with overlayed squares) and choose:
-
Wrong Pick: The product doesn't belong to this shipment
- Optionally enter the actual SKU for your records
- The system will exclude it from shipment counts
-
Correct Product: The SKU is correct but the label couldn't be read
- Select the correct product from the dropdown list
- The system will update the count accordingly
-
Invalid Product Detection: The system detected something that isn't a product
- The detection will be removed from counts entirely
-
Continue: Skip identification for now
- Unidentified products will be labeled as such
- You can identify them later after completing the inspection
TIP: Addressing identification issues during the inspection ensures more accurate final counts. However, if you're under time pressure, you can continue and resolve identification issues later from the Final Count Page.
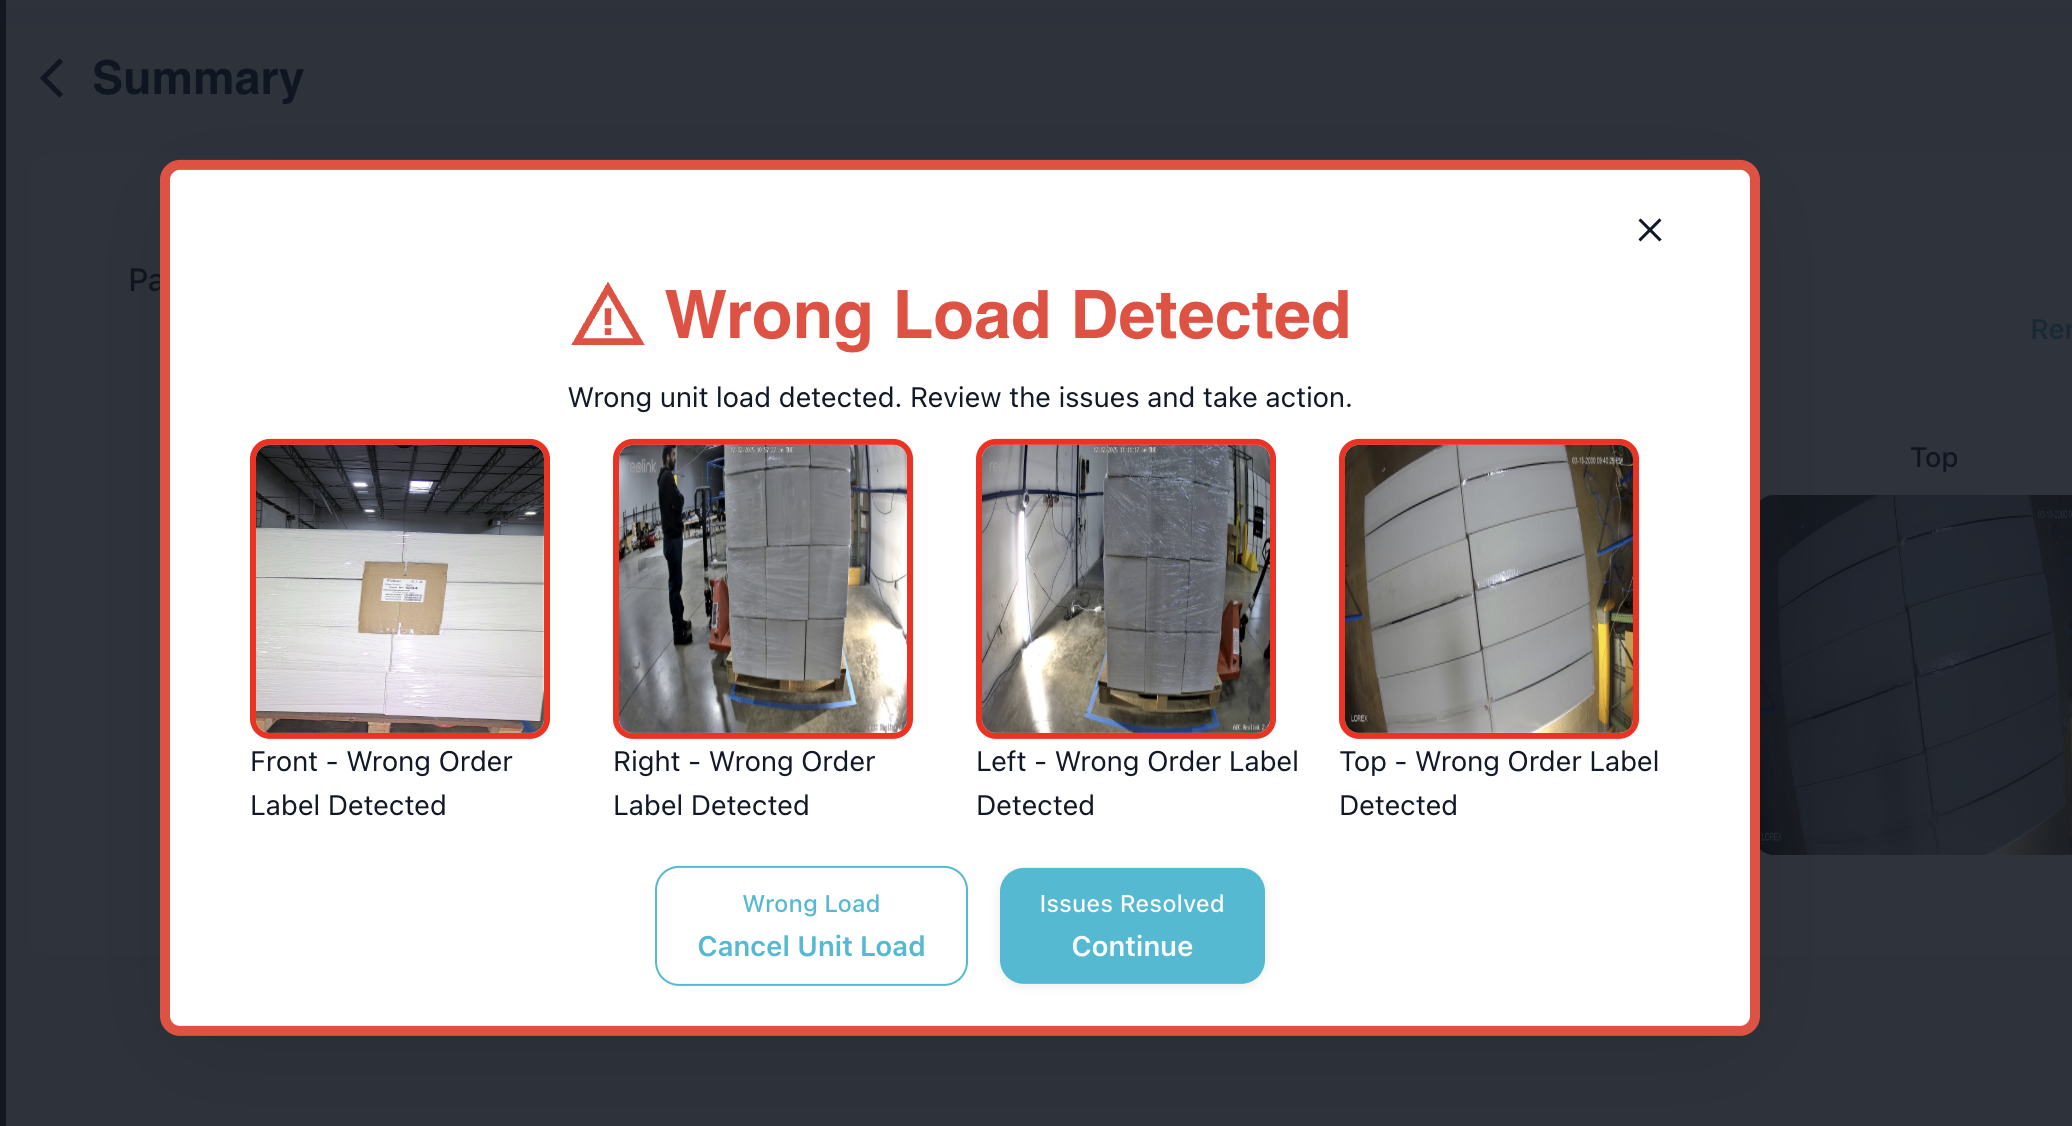
Wrong Load or No Order Numbers/Pallet Identifiers Detected Popups
If Load Verification is enabled, the system may display popups for the following scenarios:
- Wrong Load Detected: The system detected a load that was not expected in the designated area/quality station.
- No Order Numbers/Pallet Identifiers Detected: The system couldn't find any order numbers or pallet identifiers on the pallets. This may be due to missing or unreadable labels, poor lighting, or other factors.
For more information about load verification, click here.
Wrong Load Detected
The system will display a popup showing the unit/load in question. The user will be the ability to take corrective actions based on the detected issues, and resolve the issue as necessary. "Cancel Unit Load" will persist the images of the unit but will not be added to the pallet counts or progress of the shipment (for documentation purposes only).
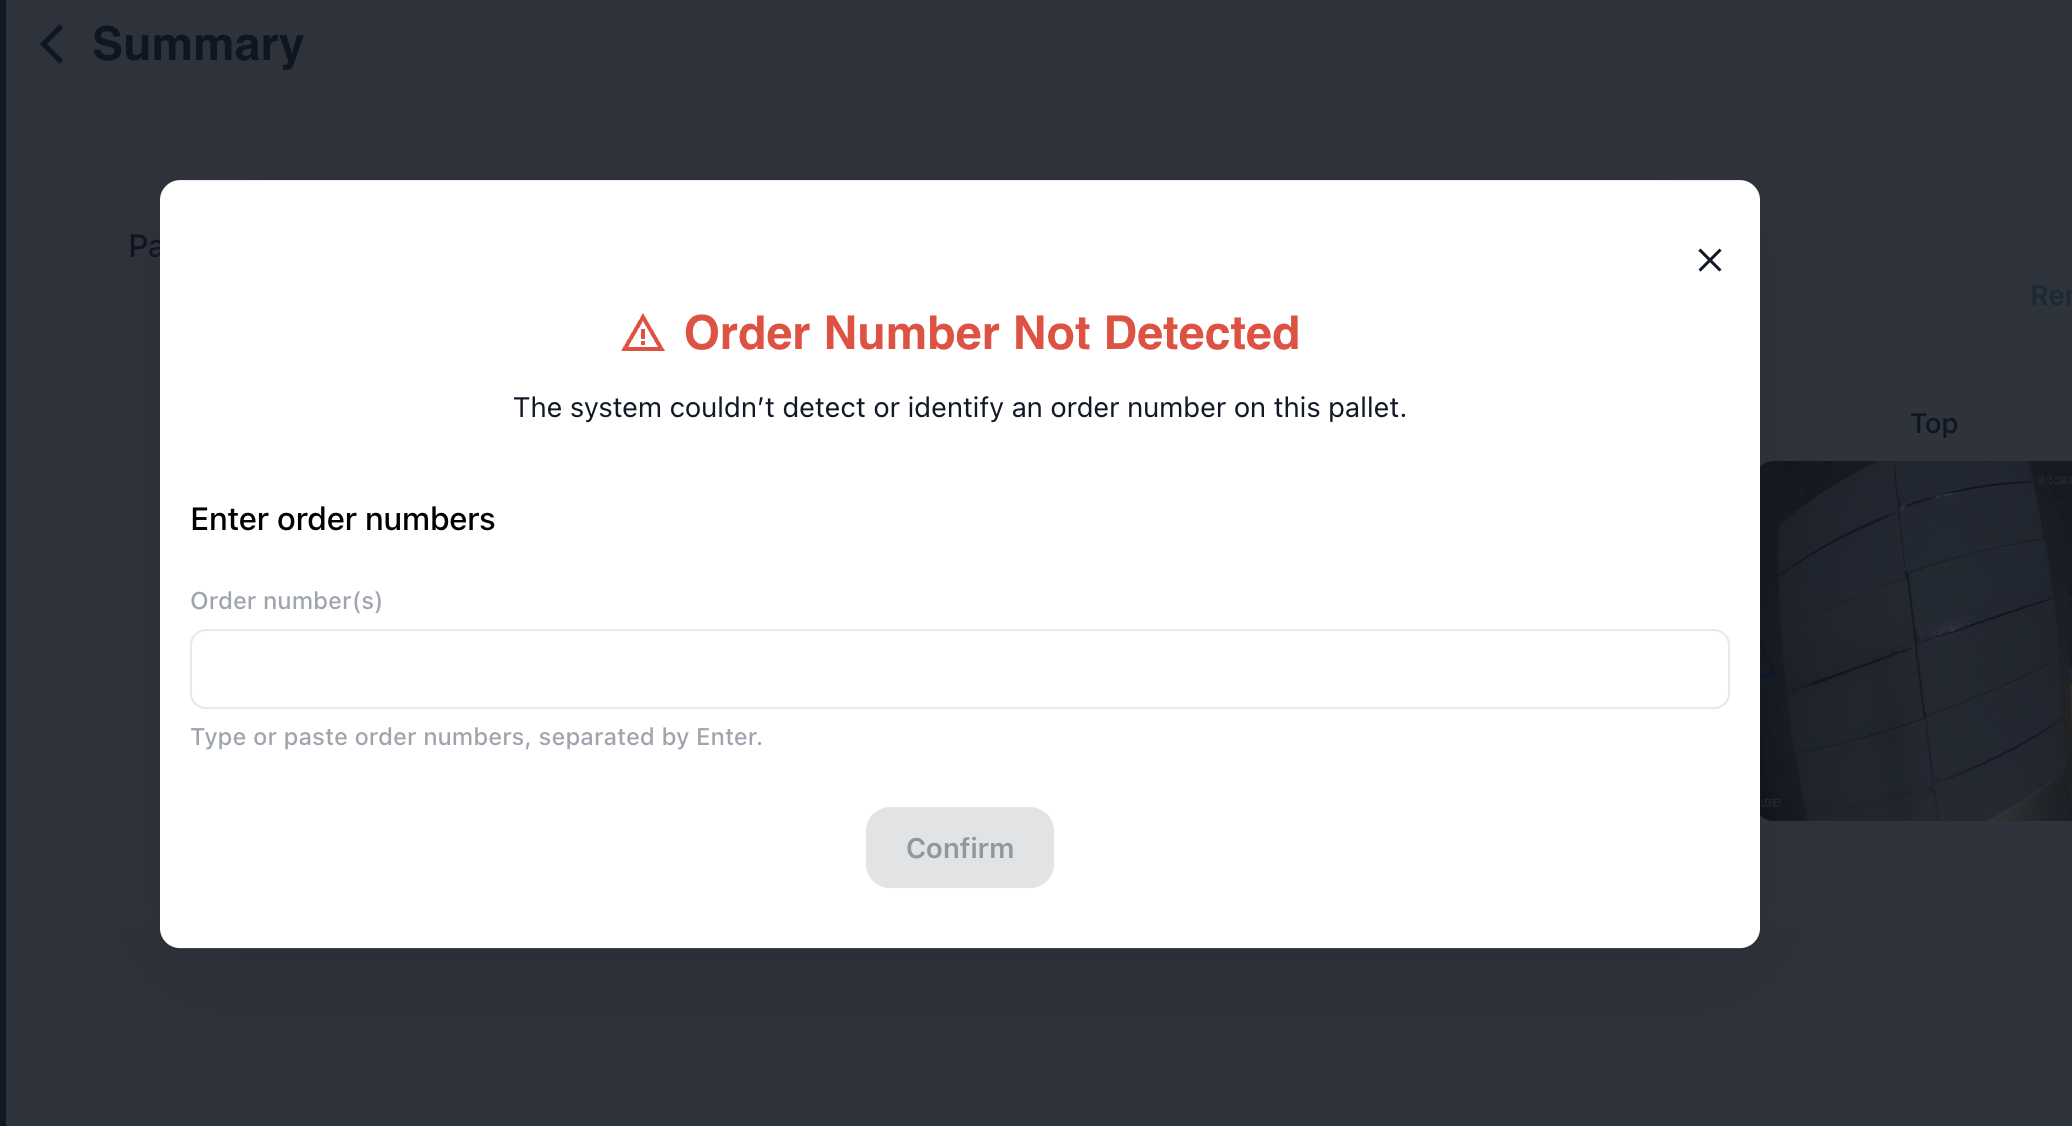
No Order Numbers/Pallet Identifiers Detected
The system will display a popup requesting manual intervention to identify the pallets. Users will need to enter order numbers or pallet identifiers manually.
Final Count Page
The Final Count Page is the review and confirmation step before submitting your shipment inspection. This page displays the AI-generated count results for all products in the shipment.
Note: This page only shows if product counting is enabled.
Reviewing AI Counts
On this page, you'll see:
- Product Name and SKU: Each product that was detected in the shipment
- Expected Quantity: The quantity from your WMS/PO (if integrated)
- AI Counted Quantity: The quantity detected by Arvist's AI from the unit images
- Match/Mismatch Badges: Color-coded badges indicating whether the expected quantity matches the actual counted quantity
- Match: Expected and actual quantities are the same
- Mismatch: Discrepancy between expected and actual quantities
Adjusting Counts
If you notice any discrepancies or need to make corrections:
- Click on the count field for the product you want to adjust
- Enter the correct quantity based on your manual verification
- The match/mismatch badge will update accordingly
Quality Check Results
If the Quality Checks module is enabled, you will also be able to see whether any damages were detected from this page:
- No Damages Detected: Displayed in green with a checkmark icon
- Damages Detected: Displayed in red with a warning icon
Click on Damages Detected to review detailed information about any identified issues. Learn more about quality checks.
Submitting the Shipment
After reviewing the counts and addressing any damages:
- Verify that all quantities are accurate
- Review any quality check alerts if applicable
- Click Submit to complete the shipment inspection
Once submitted:
- The shipment status will be updated in your WMS (if integrated)
- The actual quantities will be recorded for inventory purposes
- Any detected damages will be documented for future reference
- You'll be returned to the Shipment Inspection homepage
TIP: If you need to cancel the shipment inspection at any point during the final review, use the back arrow or cancel button to return to previous steps. Your progress will be saved until you click Submit.
Advanced Features
Automated Inspection
Arvist supports two automated inspection methods that reduce manual intervention and integrate with warehouse automation systems.
1. Automated Detection (Quality Station Configuration)
Enables continuous camera monitoring that automatically detects wrapped pallets, reads their labels, and initiates inspections without operator input.
Configuration:
- Available in Advanced Configurations when creating/editing a quality station
- Requirements: Product Configuration = "Wrapped Pallet", Station Type ≠ Mobile Device
- Compatible Inspection Types: Quality Checks and/or Photo Documentation Only (Product Count not supported)
How It Works:
Cameras continuously monitor the inspection zone. When a wrapped pallet enters the field of view, the system automatically detects it, reads the order number(s) from the label, creates or matches the shipment in the database, captures images from all configured angles (Front, Left, Right), processes them for quality checks or documentation, and updates the shipment status. Any device with that quality station selected is automatically redirected to the shipment summary page for real-time review.
Simultaneous inspections of multiple shipments on the same station is supported. When viewing an existing shipment and another shipment is being inspected:
- If the operator is not currently managing any issues/alerts (meaning popups are not open):
- The system will automatically switch to the new shipment being inspected.
- If the operator is currently managing issues/alerts (meaning popups are open):
- The system will not switch to the new shipment.
- Instead, clickable toast messages will appear in the bottom right corner, allowing the operator to view any alerts from the other shipment and click to switch to that shipment if desired.
NOTE: If "Total # of Pallets" is modeled on the pallet label, the system will automatically complete a shipment when the total number of detected pallets matches the modeled value UNLESS UNRESOLVED ALERTS ARE PRESENT. Otherwise, the shipment will remain "in progress" until a user manually reviews and completes the shipment.
Use Cases: High-speed dock doors, conveyor belts, gate inspections where wrapped pallets need automatic capture and documentation as they pass through.
2. API-Triggered Automated Inspection
Allows external systems (WMS, ERP, scanners, RFID) to programmatically start inspections via API, enabling warehouse orchestration where external systems control inspection workflows.
API Endpoint: POST /v1/api/quality/inspection/shipment
Key Parameters:
order_numbers: A list of Order/PO numbers (required if id not provided)area_name: Quality station name (auto-resolves to area_id)type: "inbound" or "outbound" (optional, default: "inbound")supplier: Supplier name (optional)line_items: Product list with expected quantities (optional)
Key Features:
- Identify shipments by
idororder_numbers - Use quality station name (
area_name) instead of internalarea_id - Automatic shipment creation if it doesn't exist
- Real-time UI navigation for operators via WebSocket
Use Cases:
- WMS Integration: WMS detects shipment ready for inspection and triggers Arvist API, automatically opening the inspection interface on operator devices
- Barcode/RFID Scanners: Scanner reads pallet order number and calls API to auto-start inspection at the designated quality station
Configuration Requirements:
- Quality station configured with appropriate type, cameras, and zones
- API credentials for external system
- WebSocket and MQTT network connectivity
- Consistent quality station naming for
area_nameparameter
For API documentation details (authentication, request/response formats, error codes), contact your Arvist representative.
Alternate Option for Populating Shipment List
The main way to populate the shipment list is to connect your ERP/WMS system with our application. This is the preferred method, as this allows us to stay in sync with your data and update your WMS during the shipment inspection process. However, for testing and/or for users who are not able to connect, there is an option to upload a CSV file.
To upload a CSV file, the inspection mode field in the site configuration settings must be set to csv. On the main Shipment Inspection page (on desktop only), click the button in the top right corner labeled Upload CSV. This will present a popup with an option to upload from your file manager or drag and drop. After adding any number of CSV files, click Submit. The page will refresh and your new shipments will be added to the list of available shipments ready for processing.
CSV File Format
The CSV file can contain any column names you would like. However, these names must be mapped in our application configuration file. Please discuss with an Arvist team member before enabling this feature.
An example CSV file is below (with the generic/default column names):
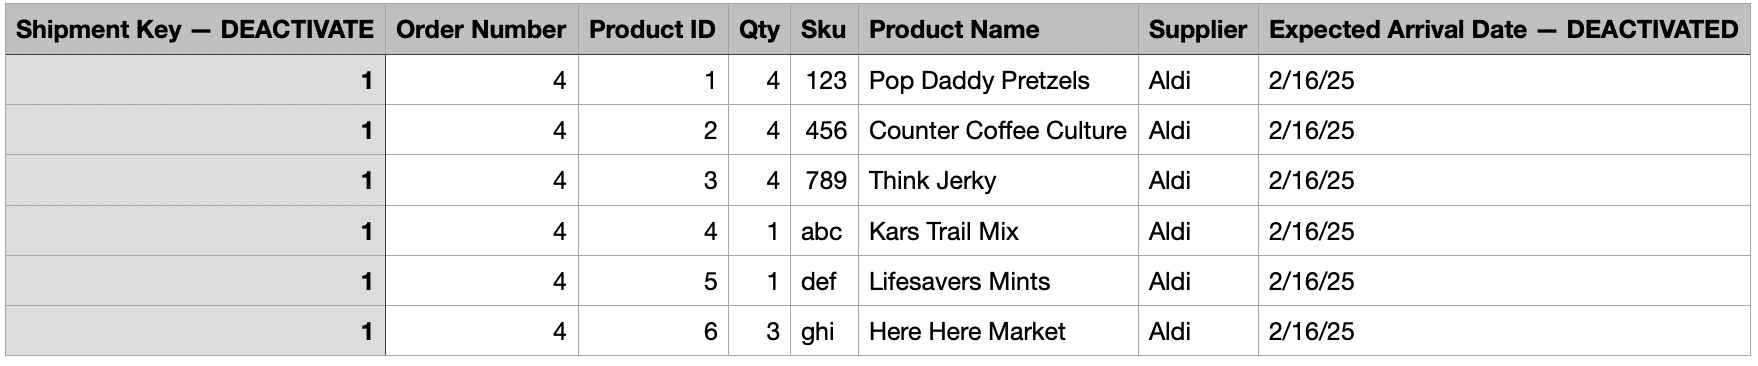
The following keys are optional:
- Shipment Key
- Supplier
- Expected Arrival Date / Required Ship Date (either option works for dates)
- Dock Door
- However, this is required for automated load verification
- Pallet Identifiers
- Only required if unique pallet identification is required for load verification and pallet identifiers are modeled on the label
- WMS Site ID
- Only required for multi-tenant environments. This is the site id from the WMS that will be mapped to the Arvist DB based on the
wms_site_idvalue stored in the sites table
- Only required for multi-tenant environments. This is the site id from the WMS that will be mapped to the Arvist DB based on the
You can either remove those columns altogether, or add additional text to the column name, which will eliminate it from the mapping process (We've used DEACTIVATE in our example for clarity).
NOTE: If no date is provided, the shipment will be created for the current date.
NOTE: If you decide to use
Shipment Key, this MUST be unique to each shipment created. If you do not change theShipment Keyvalues for multiple consecutive CSV uploads, the data already in our db with that shipment key will be overwritten. In most cases, leaving this column out entirely is ideal.